Below, explains how to include Kiuwan if you use Microsoft TFS or Azure DevOps (formerly known as VSTS or Visual Studio Team Services).
If you use Microsoft TFS or Azure DevOps (Formerly known as VSTS or Visual Studio Team Services) to build your application, you can use this extension to include Kiuwan analyses as part of your build definitions.
| This plugin is an Open Source project in Github and is offered "As Is". This means that it does not have official support from Kiuwan or Idera. Any support provided is based on our best effort. There is no SLA associated with this plugin or any of the incumbent components, such as Microsoft Azure DevOps environment, Team Foundation Server, or the Agents executing the pipelines. |
Getting Started
This section provides information about how to get, install, set up, and use the Kiuwan TFS Extension, and other relevant information.
Install the Kiuwan TFS Extension
Before installing the extension, make sure you have a Kiuwan account in our cloud service or an on-premise installation of the Kiuwan platform.
The included build tasks work on TFS Windows, Linux or MacOS agents and Azure DevOps private or hosted Windows, Linux, and MacOS agents.
| For Azure DevOps Server and Azure DevOps private agents, you do not need to pre-install the Kiuwan Local Analyzer (KLA). The first time you run a Kiuwan task the KLA will be downloaded and installed in the agent's tools directory (in a Windows host it is typically C:\agent\_work\_tool) that ran the Kiuwan build task. Next time the same agent runs a Kiuwan task it will use that installation. If there are any issues with the KLA installation or you need to remove it to have a fresh install in the next task run, go to that directory and just delete the KiuwanLocalAnalyzer folder found there. For hosted agents (that are provisioned dynamically), the KLA is downloaded and installed every time a Kiuwan task runs. Also, please, review and take in mind the Kiuwan Local Analyzer Installation Requirements. |
Get the extension
Follow these steps to get the Kiuwan Extension for Azure DevOps:
- Use the following URL to get the Kiuwan extension for Azure DevOps: Kiuwan TFS Extension.
- Select the Get it free button.
- Sign in to your Azure DevOps account if prompted, or download it to install it in your TFS server 2017 (15.0.*) or higher (Azure DevOps Server now).
Configuration and deployment
You get a service endpoint type and two build tasks. Below, find more details:
New Service Endpoint Type
To connect to the Kiuwan platform from TFS/Azure DevOps. You can define a new service endpoint to the Kiuwan platform by following these steps:
- Under the Services configuration tab of the TFS/Azure DevOps Services, select Kiuwan Platform service connection type from the New Service Endpoint drop-down.
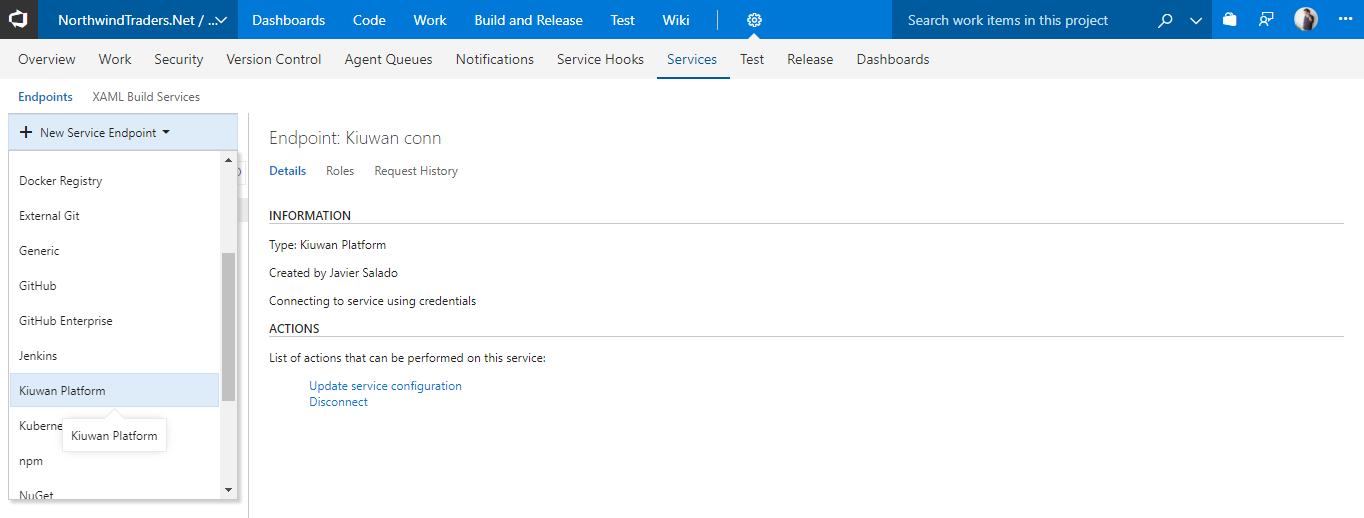
- Enter a name for the Kiuwan connection and configure your account credentials to connect.
- If you configured your Kiuwan account to use SSO authentication, configure your Kiuwan Domain ID provided by your Kiuwan administrator.
- If you configured your Kiuwan account to use SSO authentication, configure your Kiuwan Domain ID provided by your Kiuwan administrator.

Kiuwan Baseline Analysis
This task runs a Kiuwan baseline analysis as part of your build definition. Choose the name of the application in Kiuwan you want to associate the results to and select one of the three following options to use as Kiuwan application name:
- $(System.TeamProject): This variable is used for the Kiuwan application name, by default. If an application with the same name as the project does not exist in Kiuwan, it is created automatically.

- Kiuwan application from list: This option associates the results to an existing application in your Kiuwan account. When you select this option, the available Kiuwan applications display, this list is populated from your account, which is based on the credentials you set up in the Kiuwan service endpoint.
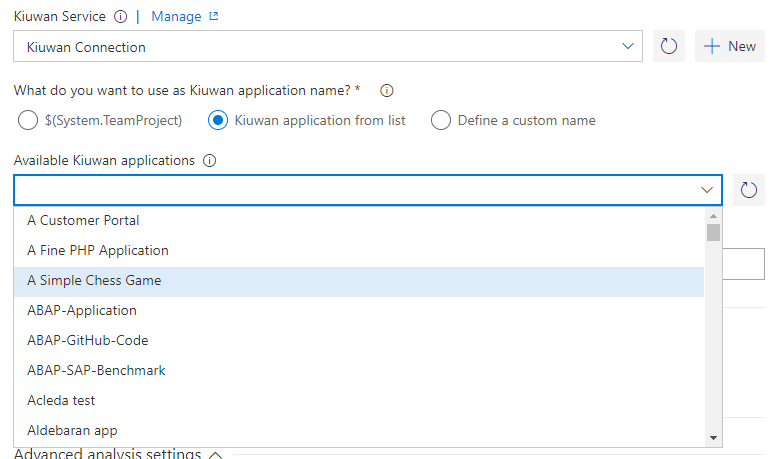
- Define a custom name: Select this option to create a new application in your Kiuwan account. Enter a name in the Kiuwan application name box.

Analysis label
Use this option to identify your analysis in Kiuwan, the build number is automatically appended to the label you set here.

Include Insights Analysis
Check this option when Insights product is available for your organization; if you want that Kiuwan Local Analyzer runs Insights analyses, and upload their results.
Upload code fragments of found defects
Uncheck this option if you do not want to upload the lines of code where defects and/or vulnerabilities are found. Note that these lines of code are essential for the proper functioning of certain features, such as the inspection of differences in results between analysis. If you disable it, these features may not work properly.
Upload analyzed source code files
Check this option if you want to use the functionality of the Kiuwan built-in code viewer, which allows you to see the full source code of your analyses.
Security analysis performance
To improve the performance when running security analyses, you can skip duplication of code detection, since it is not relevant for Security analyses results.
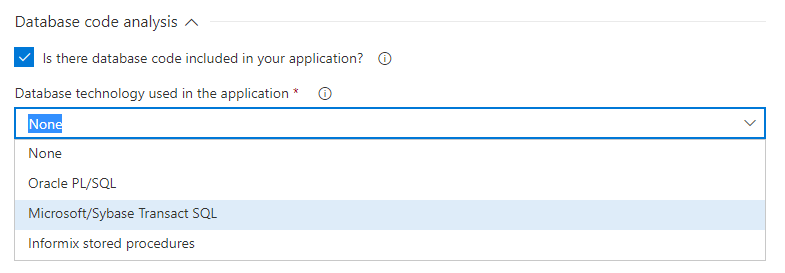
Database code analysis
If your project includes database code such as stored procedures for Oracle, SQL Server, or Informix, you have to select their type to analyze them.
Advanced analysis settings
You can set the following advanced settings to control the analysis:
- Override of .kiuwan file: Check if you want to override the values of the encoding and include/exclude patterns from the .kiuwan file in the application with the values set here.
- Override application's model: Check if you want to override the configured application's model. Please note that this model is associated with the application and is used for future analyses of this application.
- Encoding of the source code (use java encoding strings).
- Include patterns, antlike patterns to specify the directories and files you want to analyze from your source code structure.
- Exclude patterns, antlike patterns to specify the directories and files you don't want to analyze from your source code structure. These are applied after the include patterns.
- Maximum memory to allocate for the analysis, increase it for very large analyses.
- Analysis timeout, the default of 1 hour should be enough for most applications. Increase it for very large applications.
Results
After a successful run of a build definition with a Kiuwan baseline task, the results are immediately available in your Kiuwan account.
The results are automatically uploaded to your Kiuwan account in the cloud where you can see them and browse through the security vulnerabilities and other relevant defects found in your applications.

You can also check the Kiuwan results directly in the Kiuwan tab of the TFS/Azure Job results:

Kiuwan Delivery Analysis
To use this task you need to have the Life Cycle module in your Kiuwan account. It allows you to audit the deliveries of your application's change requests. The task runs a Kiuwan delivery analysis as part of your build definition. The results are automatically uploaded to your Kiuwan account and the defined audit is run comparing the results with the latest existing application baseline. The OK or Not OK (OK/NOK) audit result is what the task will return. You can decide if you want to fail the build step or not based on the audit result.
The Kiuwan service connection, the Kiuwan application name, the analysis label, the security analysis performance, the database analysis, and advanced analysis settings behave the same as in the baseline analysis task described and explained in the previous section. Below, you can find more information on the delivery analysis of specific options:
Change request name
This Change request name belongs to the change that we are analyzing. View the change request as the project management object specifying the change requirements. The CR concept does not belong to the life cycle itself, is a management concept.
By default, the placeholder is $(Build.SourceBranchName). In many projects typically those that use Git as SCM, branch names are given according to the changes they contain.
Override delivery label
By default, the delivery label is a combination of different Azure DevOps/TFS variables, considering the repository type and the build triggers. Check this option to specify your custom label.
Analysis scope
Select if you want a complete delivery (all the code base including the changes) or a partial delivery (just the changes)

Kiuwan audit fail
When this option is checked the build task fails if the Kiuwan audit that runs automatically after the analysis fails. Uncheck this option if you want to run the analysis and the audit, but you do not want to break the build.

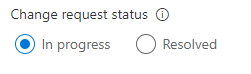
Change request status
The Kiuwan change request status option allows you to tag the analysis, In progress, when the changes have not been completed. Select Resolved when you consider that the changes have finished.
Results
Remember that the overall result of the audit is returned by the task and you can conditionally break your build.
Once the task runs you can immediately see the results in your Kiuwan account. Including all the details of the audit and the defects and vulnerabilities that need to be fixed to pass it.
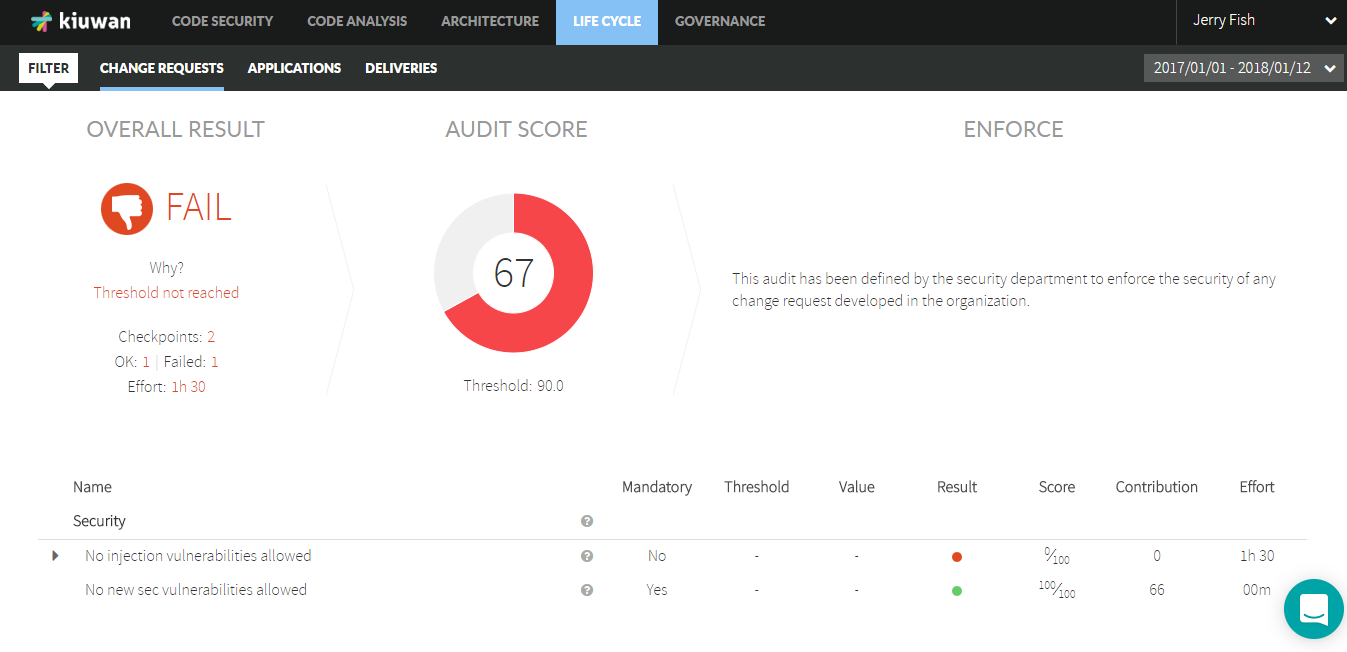
You can also check the Kiuwan results directly in the Kiuwan Audit tab of the TFS/Azure Job:

Set the Debug Variable
This section shows you the two options of how to set the debug variable in Azure DevOps/TFS pipelines to get the debug information from the execution of the tasks.
Option 1: Set a variable in each execution.
To execute the pipelines manually follow these steps:
- Use the Pipelines dialog to select more options of the execution from the list of pipelines. Select the pipeline you want to execute.
- Click the Run pipeline button

- When the Run pipeline dialog opens, click Variables.

- Click system.debug and change the value to "true".

- Click Update, go back to the run page of the dialog, and click Run.
Option 2: Set a variable for all the execution.
To set the variable for all the execution, follow these steps:
- Edit the pipeline you want to change.

- Go to the Variables tab and change the value of system.debug to "true". This change is persistent in all the pipeline execution and executes the tasks verbose.

Kiuwan Proxy Support
This section explains how to configure the TFS Azure plugin when a Proxy Server is needed. Before this configuration, take into account the following requirements: You are using Azure DevOps in the cloud, the installed local agent to run the pipelines are in LOCAL, and the internet access through a proxy server is needed.
Local Agent Configuration
When you are using a Local Agent to execute the Azure DevOps pipelines, you can see the agent from the Azure console listed under the Agent Pools screen, click the Default option:

The Default screen displays the Agents tab among others. You can review more information about the selected agent like the Name, when was the Last run, the Current status, the Agent Version, and the switch to Enable or Disable it. This is a hosted agent running in a physical or virtual machine in Linux, Mac or Windows OS.
Configure the Agent using a proxy server
You can configure the agent by using the Run a self-hosted agent behind a web proxy guide. Download the agent into a local folder and then configure it. If you are using a proxy server, execute the configuration command using the parameter to set the proxy:
.\config.cmd --proxyurl 'http://${proxyhost}:${proxyport}' --proxyusername '${proxyusername}' --proxypassword '${proxypassword}' |
Where the different placeholders are:
${proxyhost}: the Proxy host (e.g. proxy.kiuwan.com)
${proxyport}: the Proxy port (e.g. 3128)
${proxyusername}: your Proxy username for authentication
${proxypassword}: your Proxy password for authentication
As an example, here you can see a PowerShell with the command with all the parameters:

When using an Agent in any of the pipelines, you must specify the type of agent. |
The pipeline executes the Kiuwan analysis tasks in any agent available in the Default private agent pool, which refers to the Local Agent on Windows. Check the image below.
