This guide will explain how to install the monolithic version of Kiuwan On-Premises.
Contents:
Kiuwan On-Premises Installation Guide
System Architecture Overview
Kiuwan On-Premises (KOP) is based on a client-server architecture with the following major server components:
- WildFly application server
- MySQL database
- Redis in-memory datastore
KOP solution is deployed on a centralized server (all the components are installed in the same host) and accessed by users via HTTP website access or by IDE plugins (Eclipse, Visual Studio).
KOP also supports distributed architecture with high-availability and load-balancing. For these scenarios, please contact Kiuwan support.
Server Host Requirements
Installation requirements
The Kiuwan On-Premises (KOP) solution is deployed on a centralized server host (all the components are installed in the same host) and accessed by users via HTTP or by IDE plugins (Eclipse, Visual Studio).
KOP installation process consists of building a Docker image.
Server Host Requirements
Linux kernel version 3.10 or higher
If your OS is RedHat, CentOS or Fedora please check these Special requirements for RedHat, CentOS, and Fedora.
CS Docker Engine version 1.10 or higher installed on your server
Connectivity to SMTP Mail Server (i.e. remotely accessible or locally installed)
The first phase of the installation process (building the Kiuwan image) requires Internet connectivity
The installation must be executed by a Unix user with privileges to execute docker server commands.
During the installation process, you will need to specify a KOP UNIX user and group :
- KOP user will the owner of the KOP processes that will run within the docker container
- the docker persistent volume will be owned by KOP user
KOP User and Group is specified during the KOP Installation process as KIUWAN_USER and KIUWAN_GROUP properties
You can create a KOP user and group by executing the next commands (no special privileges are needed):
- sudo groupadd ${KIUWAN_GROUP}
- sudo useradd -g ${KIUWAN_GROUP} -s /bin/false -m -d /home/${KIUWAN_USER} ${KIUWAN_USER}
KOP Persistent Volume is created by the installation process and must be specified as DIR_PERSISTENT_VOLUME property
Be sure to dispose of a minimum of 6 GB of free disk space :
3 Gb for Docker image
3 Gb for KOP Persistent Volume
- The recommended size for KOP persistent volume is 50 Gb
- Try to specify an independent disk/partition, so you can easily increase it later if needed
Special requirements for RedHat, CentOS, and Fedora
If your docker server is running on RedHat, CentOS or Fedora, be sure the filesystem where docker is installed supports d_type.
If d_type isn't supported, you've to change it as soon as possible to prevent strange filesystem issues with Docker containers.
Some installation of the above-mentioned operating systems aren't configured with d_type support (see http://www.pimwiddershoven.nl/entry/docker-on-centos-7-machine-with-xfs-filesystem-can-cause-trouble-when-d-type-is-not-supported)
Running on XFS without d_type support causes Docker to skip the attempt to use the overlay or overlay2 driver.
Existing installs will continue to run, but produce an error. See https://docs.docker.com/storage/storagedriver/overlayfs-driver/#prerequisites
You can check if your existing XFS filesystem has d_type enabled by running these commands
$ docker info | grep "Supports d_type:"
Supports d_type: true

$ xfs_info /docker-mount-point | grep ftype
naming =version 2         bsize=4096      ascii-ci=0     ftype=1
In case you get d_type: false or ftype=0, you have to create a new XFS filesystem with d_type support enabled.
Unfortunately, it isn't possible to enable d_type support on an existing filesystem.
You have two options:
- either add a new disk and you create a new XFS partition on it, or
- back up your existing data and recreate the XFS filesystem with d_type support enabled.
Creating a new XFS filesystem with d_type enabled is as easy at the following command:
$ mkfs.xfs -n ftype=1 /mount-point
CPU and memory requirements
Server CPU and memory requirements depend on several factors:
- how many lines of code will need to be scanned
- how many analyses will need to be executed in parallel
- how many users will access the web application
It's important to notice that we're assuming the typical use case where code analyses are performed locally through Kiuwan Local Analyzer and therefore out of server machine (typically at a user machine or within a build CI system).
Therefore, when we talk about the analysis we mean 2nd phase of the analysis (i.e. indicator calculation that is executed within the host server)
Above factors heavily influence host server requirements, but minimum requirements are:
| Operating System | RAM | CPUs | Disk | Other SW |
|---|---|---|---|---|
Linux kernel version 3.10 or higher | 16 GB | Intel i7 2,5 GHz with 4 cores | 750 GB | CS Docker Engine version 1.10 or higher |
Note: CPU clock speed and disk speed will affect overall response time.
Above configuration is recommended for a system load that requires continuous service for:
- parallel execution of 2 analyses (any additional parallel analysis request will be enqueued, and it will be executed as soon as any of the running analyses finishes), and
- 50 concurrent web-users
Additional system requirements can be met by following the next recommendations:
- In case you need a higher number of parallel analyses executions, you should add 1 CPU core and 512 Mb for any additional required parallel analysis
- In case you need to improve response time to web users, consider to add 1Gb for every 50 additional web users.
Dependencies
KOP docker image is build based on these external dependencies
| Software | Version |
|---|---|
| Ubuntu | 16.04 |
| MySQL | 5.6 (latest available build) |
| WildFly | 10.0.0.Final |
| Redis | 3.0.7-1 |
| JDK | 8.0_202 |
| Ant | 1.7.1 |
| Gradle | 4.7 |
| AspectJ | 1.9.1 |
| NPM | 10.7.0 |
| MongoDB | 3.6.5 |
| MySQL JConnector | 5.1.39 |
| Additional Ubuntu packages | apparmor-utils \ ca-certificates \ apt-transport-https \ |
Installation steps
Before installing KOP, make sure that you understand the System Architecture Overview, that your server host(s) complies with the Server Host Requirements, and that you have properly prepared the Environment as follows:
Before installing KOP, make sure your server host complies with the Server Host Requirements
Step 1. Unpackage KOP Installation Package
The KOP Installation Package consists of a tarball gz file (docker-for-kiuwan.tar.gz) containing all the kiuwan docker files.
- Copy the distribution tarball to your host server’s installation directory ($KOP_INSTDIR)
- Uncompress the distribution tarball:
- tar xvzf docker-for-kiuwan.tar.gz
This will create a $KOP_INSTDIR/master.YYYYMMDDHHMM.buildnumber directory with all the kiuwan docker files
In $KOP_INSTDIR/master.YYYYMMDDHHMM.buildnumber you will find a file named Dockerfile where you will configure the Kiuwan docker image.
KOP Licenses are distributed through a zip file that contains two license distribution zip files:
- license.zip
- configq1.zip
To install the licenses:
- Copy both zip files to the "license" directory of your KOP installation directory
- cp license.zip $KOP_INSTDIR/master.YYYYMMDDHHMM.buildnumber/license
- cp configq1.zip $KOP_INSTDIR/master.YYYYMMDDHHMM.buildnumber/license
- Continue configuring and building your KOP image
Please visit How to Install KOP Licenses is you need to reinstall (or upgrade) licenses after the docker container is built.
Step 2. Configure Kiuwan Docker image
After unpackaging, you should configure the docker image to be built.
Configuration of Kiuwan docker image is currently done by creating a configuration file (settings.custom) that will be used during the image building process.
There's a file (settings.tpl) you can use as a template to configure your settings.
- Create settings.custom file by copying the template file
- cp settings.tpl settings.custom
- Edit the properties of settings.custom file
KOP Deployment scenarios
Before to install KOP, you should decide your KOP deployment scenario.
KOP Deployment scenarios
Different KOP deployment scenarios are depending on using an intermediate web server or accessing directly the KOP app server:
Direct connection to KOP AppServer
through HTTP
through HTTPs
Connection to KOP AppServer through a WebServer
through HTTP
through HTTPs
Below picture displays these different scenarios
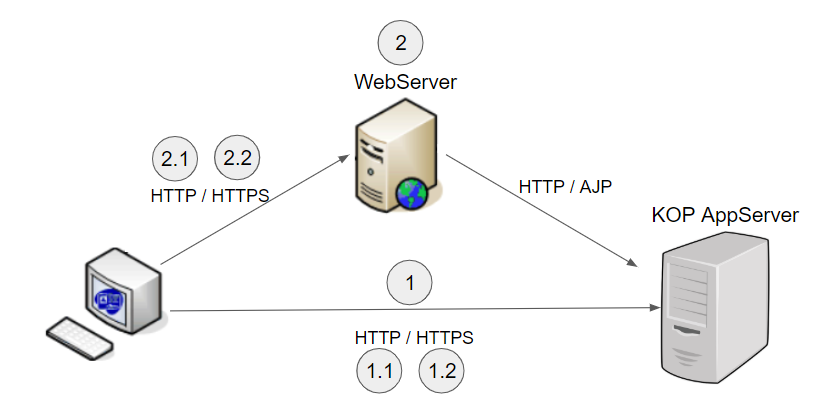
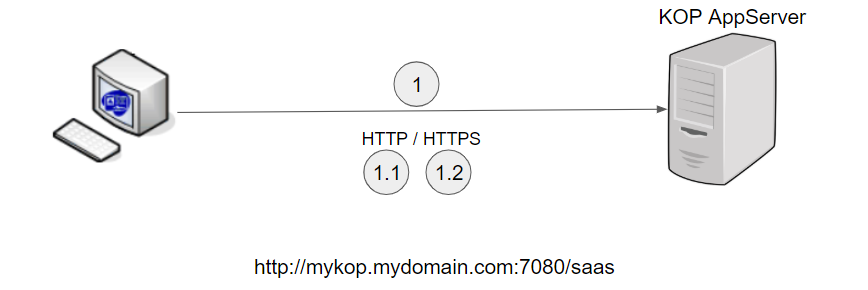
Scenario 1 - Direct connection to KOP server
First, you should decide on the external URL that KOP clients will use. By KOP clients, we mean Browsers, Kiuwan Local Analyzer, Kiuwan for Developers and API-REST clients.
IMPORTANT: the KOP installation process will create a docker image that will use internally this URL.
After building the docker image, if you decide to change the configured URL you must create the image again.
So be sure of your KOP URL before creating the image.
To configure your KOP in this scenario, please follow the next steps
Scenario 1.1 - Direct KOP access through HTTP
Your URL will be something like http://mykop.mydomain.com:7080/saas
You must configure below properties:
| PropertyName | Value | Comment |
|---|---|---|
| KIUWAN_HOST KIUWAN_PORT | mykop.mydomain.com | Hostname (Fully Qualified Domain Name, see note below ) and port number to access KOP. These variables will be used to build the Kiuwan URL. Example (with default values):
Fully Qualified Domain Name (FQDN): https://en.wikipedia.org/wiki/Fully_qualified_domain_name
Must match KIUWAN_WEBSERVER_HOST |
KIUWAN_WEBSERVER_PROTOCOL | http | |
KIUWAN_WEBSERVER_HOST | mykop.mydomain.com | Must match KIUWAN_HOST |
Scenario 1.2 - Direct KOP access through HTTPS
Your URL will be something like https://mykop.mydomain.com:7080/saas
Procedure :
First, create the image as HTTP using 1.1 HTTP scenario configuration (PremisesInstallationGuide-Scenario1.1-DirectKOPaccessthroughHTTP)
Once the image is built, convert it to HTTPS following steps described at PremisesInstallationGuide-Step5.(Optional)MakingKiuwanOnPremiserunningonHTTPS
Scenario 2 - Connection to KOP server through a WebServer
In this scenario, a web server (typically Apache) is used as a frontend server to redirect to the KOP app server.
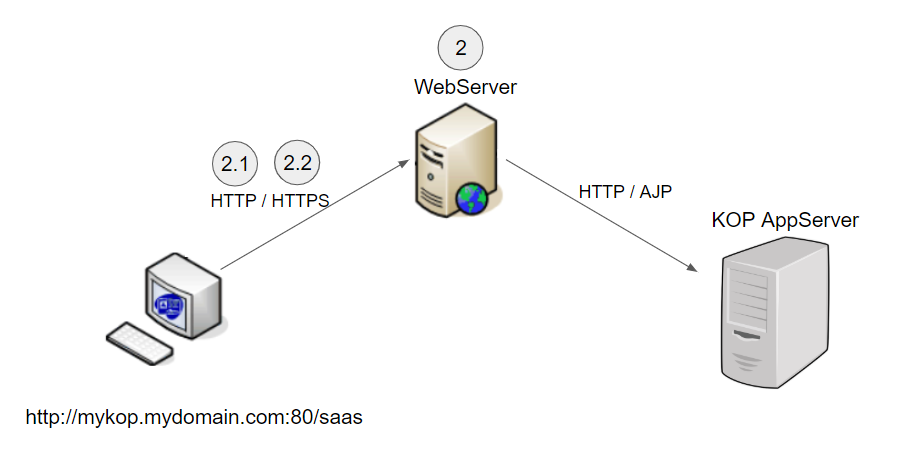
As in the “direct” scenario, you should establish the URL to be used to connect to KOP.
Let suppose that will be something like http://mykop.mydomain.com:80/saas
Additionally, you will need to configure the “internal” KOP app server URL, for example, http://my_internal_kop.mydomain.com:7080/saas
Please note that WebServer can communicate to the KOP app server either through HTTP or AJP. You can configure the corresponding ports (KIUWAN_PORT and KIUWAN_APPSERVER_AJP_PORT).
| PropertyName | Value | Comments |
|---|---|---|
HTTPS | [ ON | OFF ] | |
KIUWAN_WEBSERVER_PROTOCOL | [ http | https ] | If HTTPS=OFF, specify http IF HTTPS=ON, specify https |
| KIUWAN_WEBSERVER_HOST KIUWAN_WEBSERVER_PORT | mykop.mydomain.com | External KOP hostname (Fully Qualified Domain Name, see note below ) and port number to access KOP. These variables will be used to build Kiuwan URL. Example (with default values):
Fully Qualified Domain Name (FQDN): https://en.wikipedia.org/wiki/Fully_qualified_domain_name |
| KIUWAN_HOST KIUWAN_PORT | my_internal_kop.mydomain.com | Internal KOP hostname (Fully Qualified Domain Name, see note below ) and port number to access KOP. These variables will be used to build an internal Kiuwan URL. Example (with default values):
Fully Qualified Domain Name (FQDN): https://en.wikipedia.org/wiki/Fully_qualified_domain_name
KIUWAN_HOST must be different from KIUWAN_WEBSERVER_HOST. KIUWAN_PORT must be different from KIUWAN_WEBSERVER_PORT only if the frontend server and KOP app server execute in the same machine. |
KIUWAN_APPSERVER_AJP_PORT | defaults to 7009 | Port that the front-end server will use to communicate with KOP app server through AJP |
KOP Configuration properties
PropertyName | Default value | Meaning |
|---|---|---|
| SysAdmin configuration | ||
| KIUWAN_DOCKER_IMAGE | Name of the docker image (repository name) to be built | |
DIR_PERSISTENT_VOLUME | /Datavol | The root directory of docker server where the container volume will be bound |
| KIUWAN_VOL | /kiuwan_vol | Directory of the container where KOP will be installed. |
| EXTERNAL_PORT_TO_MAP_MYSQL_INTERNAL_PORT | 3306 | Docker server port to access container's MySQL
|
| EXTERNAL_PORT_TO_MAP_SSH_PORT | 2222 | Docker server port to access container through SSH
|
| MONGODB_START | false | Depending on your Kiuwan On-Premises purchased license:
|
| Proxy settings | ||
| USE_PROXY | false |
|
| HOST_PROXY PORT_PROXY | Hostname (or IP address) and port number of proxy used for Intenet connectivity during the image building process | |
| USER_PROXY PWD_PROXY | Username and password to connect Proxy.
| |
| NO_PROXY | localhost,127.* | A comma-separated list of destinations that will not be accessed through the proxy. Do not use quotes (single or double) to enclose these values. Important: KIUWAN_HOST value is automatically appended |
| KOP users | ||
| KIUWAN_USER KIUWAN_GROUP | kiuwan kiuwan | System user/group for KOP installation and execution |
| MYSQL_ROOT_PWD | root | Password for the root user of KOP's MySQL instance |
| KIUWAN_MYSQL_USER KIUWAN_MYSQL_USERPWD | kiuwan kiuwan | Username and password used by KOP to access MySQL database |
| SSH_ROOT_PWD | password | Password for root user (SSH) of Kiuwan Container |
| KIUWAN_EMAIL_ADMIN_ACCOUNT | The email address of kiuwanadmin user
| |
| KOP e-mail (SMTP) configuration | ||
KIUWAN_SMTP_HOST | SMTP host and port | |
| KIUWAN_SMTP_USER_ACCOUNT KIUWAN_SMTP_USER_PASSWORD | SMTP account: username and password | |
| KIUWAN_EMAIL_USER_ACCOUNT | Sender email address for KOP email notifications | |
Advanced configuration (WildFly, MySQL, Redis, etc) | ||
| INNODB_BUFFER_POOL_SIZE | 2G | |
| APPS_JVMMAXMEMORY | 3G | Max amount of heap memory to be used by WidlFly |
| KIUWAN_REDIS_MAXMEMORY | 2gb | Max memory limit to be used by Redis server (https://redis.io/topics/config) |
You can visit the Advanced Configuration for additional configuration parameters.
Step 3. Build the Kiuwan Docker image
After configuration, you will build the Kiuwan docker image.
IMPORTANT: Please be sure you have already installed KOP licenses, otherwise the docker image will not be built.
To build the docker image:
cd $KOP_INSTDIR/master.YYYYMMDDHHMM.buildnumber
./create_and_init_kop.sh
This step requires Internet connectivity.
If your installation uses a proxy, you should have previously configured the proxy settings.
In case you need to execute the Kiuwan container in a host server without Internet connectivity:
- Build the image in a connected server host
- Save the image, transfer it to the target host server and then load it and execute it (as further described)
After the image creation, you will be able to list the images in your docker server and identify your kiuwan image by issuing the next command:
docker images

Step 3.1 (Optional) Moving the image to another server host
After creating the image, if you want to move it to another host server you first must save it to a tarball by executing:
docker save kop:v1.2 > kop_v12_saved_image.tar
docker load --input kop_v12_saved_image.tar
Step 4. Executing the Kiuwan Docker container
After executing docker image build script (./create_and_init_kop.sh ), two scripts are generated based on settings.custom configuration file
run_kop.sh
Script to start the Kiuwan docker container and make KOP fully available and accessible to users.
run_init_kop.sh
Script to initialize the Kiuwan docker container (i.e. resetting completely the KOP installation to factory defaults) without to create a new image. This script will remove any existing data of KOP installation (for example, all the database contents will be deleted).
IMPORTANT:
- These scripts are based on settings.custom values at the moment of building the docker image.
- If you later change settings.custom file, the new configuration values will not be applied until a new image is built (and new scripts will be generated)
You can stop the Kiuwan container by issuing the following command:
docker stop <my_container_name>
Step 4.1 Execution in debug mode (only sshd)
Just in case you are running with problems while executing the Kiuwan container, you can run it in debug mode.
This means to apply the configuration but not starting the services, allowing you to access the container through ssh.
After the container is built, you can execute (run) the Kiuwan container in debug mode by issuing the following command:
docker run --rm --name <my_container_name> \
-h <my_container_host_name> \
-v <server_host_mount_dir:container_mount_dir> \
-p <ssh_port_ext>:22 \
-d \
<image_name:version>
Step 5. (Optional) Making Kiuwan On-Premises run on HTTPS
If you need to execute Kiwuan On-Premises over HTTPS protocol, please follow the next steps.
Step 5.1 Create your KOP SSL configuration file
SSL configuration is currently done by creating a configuration file (ssl.custom) within ssl directory
There's a file (ssl.tpl) you can use as a template to configure your settings.
- cd ssl
- Create ssl.custom file by copying the template file
- cp ssl.tpl ssl.custom
- Edit the properties of ssl.custom file and change default values
Property Name | Default value | Meaning |
|---|---|---|
| Commons | ||
| SSL_O | Your Organization | |
SSL_LOCALITY | Your Locality | |
| SSL_STATE | Your State | |
| SSL_COUNTRY | Your Country | |
| SSL_OU | Your Organization Unit | |
| Keystore | ||
| SSL_KS_PWD | Password for Keystore that will be created | |
| Aliases | ||
| SSL_ALIAS | wildfly | Alias of the Certificate to be created. |
| HTTPS_PORT | 8443 | HTTPS port |
Step 5.2 Create the Private key and Certificate Signing Request (CSR) for your server
- Within ssl directory execute the script CreateKey_and_ReqCSR.sh
- This script generates the CSR file under ssl/certs
- That file is named <yourhost.yourdomain.com>.csr, according to $KIUWAN_HOST configuration property
- Send CSR file to your CA (Certificate Authority)
- CA will send back to you two files:
- CA's Certificate file (IMPORTANT: rename it to ca.crt )
- Your host's Certificate file: for example yourhost.yourdomain.com.crt
- Copy received files to ssl/certs directory
Step 5.3 Create the Keystore and switch from HTTP to HTTPS
- Within ssl directory execute the script TransferFilesToContainer.sh
- This script transfers your server's certificate, your private key and CA's certificate to KOP container
Also, it transfers the script templates that will be used to create the keystore and to change the configuration from http to https
Within ssl directory execute the script run_create_Keystore.sh
- This script executes (into the container) the script create_Keystore.sh (created from template create_Keystore.tpl)
- Within ssl directory execute the script run_change_ToHTTPS.sh
- This script stops wildfly service and executes the script change_ToHTTPS.sh (created from template change_ToHTTPS.tpl), this script will create files with .rollback extension of modified ones
- Then, it starts wildfly service
After the conversion to HTTPS, please download a new version of the Kiuwan Local Analyzer from your KOP site.
Step 5.4 Just in case you are using your own CA, make it valid to your browsers and Java
If the certificate is signed by your own Certification Authority, the browsers will not recognize it as a valid CA and you will get an error messages such as:
Your connection is not private
Attackers might be trying to steal your information from youthost.yourdomain.com (for example, passwords, messages, or credit cards).
NET::ERR_CERT_AUTHORITY_INVALID
To solve this issue, you have to import your CA Certificate into your browser :
- In Chrome: Configuration >> Settings >> Advanced >> Manage certificates >> Import (ca.crt) into "Trusted root certification entity store"
Importing CA Cert into Java's Keystore must be done in the KOP Container as well as in any client machine using Kiuwan for Developers (K4D) plugin.
Log in to the KOP container and execute the next commands:
- cd /opt/jdk*/jre/lib/security/
- supervisorctl stop wildfly
- cp cacerts cacerts.bck.original
- keytool -import -noprompt -alias root -keystore cacerts -trustcacerts -file /<kiuwan_vol>/configurations/ssl/ca.crt -storepass changeitsupervisorctl start wildfly
- NOTE: change <kiuwan_vol> to the value of $KIUWAN_VOL (as configured in settings.custom)
Then, log in to your docker server and make above changes persistent (i.e. to keep them after rebooting the container):
- docker commit <kop docker name> <kop docker image>
- NOTE: run 'docker ps' to get NAMES and IMAGE values of your KOP container
Rollback to HTTP
- Log in to your docker server and go to your installation directory ($KOP_INSTDIR)
- cd ssl
- execute the script run_rollback_HTTPS.sh
After execution, KOP will come back to configuration previous to the execution of run_change_ToHTTPS.sh script.
Step 6. Accessing Kiuwan On-Premises
KOP URL
Once Kiuwan On-Premises container is running, you can access it from a browser in the following URL:
http[s]://<KIUWAN_HOST>:<KIUWAN_PORT>/saas
where KIUWAN_HOST and KIUWAN_PORT match the values of those properties as configured in settings.custom
KOP REST-API URL
http[s]://<KIUWAN_HOST>:<KIUWAN_PORT>/saas/rest/v1
KOP built-in users
KOP comes with the following built-in users.
- kiuwanadmin (password: kiuwanadmin)
- access to Kiuwan "functional" administration modules such as Users, Applications and Model Management (see Admin Guide )
- log in as kiuwanadmin to create users of your KOP instance
- sysadmin (password: sysadmin)
- log in as sysadmin to access functionalities related to monitoring and tuning KOP execution
- the sysadmin will give you access KOP sysconsole
Upgrading your KOP installation
To maintain your KOP installation up-to-date to new features, bugfixes, etc, you will have to upgrade your KOP installation.
Log in to Console as SysAdmin and check the status of your KOP installation:

The following pages describe the upgrading Installation procedures of releases of KOP, you can obtain the latest version here.
Before starting the upgrade process, it's always advisable to make a backup of the current KOP installation.
- Stop the container
- Docker stop <$KIUWAN_HOST>
- Make a backup of MySQL (optional, step #3 also makes a backup copy of MySQL)
- From the docker server, make a copy of permanent volume ( $DIR_PERSISTENT_VOLUME setting ).
- cp -rpf <$DIR_PERSISTENT_VOLUME/$KIUWAN_HOST> <$DIR_PERSISTENT_VOLUME/$KIUWAN_HOST>.bck
- Substitute DIR_PERSISTENT_VOLUME and KIUWAN_HOST with values configured at settings.custom file.
- Start the container
- run_kop.sh
A new release is distributed as a new KOP Installation Package, consisting of a tarball gz file (docker-for-kiuwan.gz) containing all the new kiuwan docker files.
- Copy the new distribution tarball to your host server’s updates directory ($KOP_INSTDIR/updates/download)
- Uncompress the distribution tarball
- tar xvzf docker-for-kiuwan.tar.gz
- A $KOP_INSTDIR/updates/download/master.YYYYMMDDHHMM.buildnumber directory will be created
- Change directory to $KOP_INSTDIR/updates/bin
To upgrade Kiuwan Core AND Kiuwan Clients:
- cd to $KOP_INSTDIR/updates/bin
- Execute the script ./updateKiuwanLauncher.sh
- This script makes all the work to upgrade your current KOP app instance to the new one (CORE and CLIENTES will be updated)
To upgrade ONLY Kiuwan Clients:
- cd to $KOP_INSTDIR/updates/bin
- Execute the script ./updateClientsLauncher.sh
- This script makes new KLA and K4D ready to be downloadable by KOP client users.
Advanced Configuration
As above specified, the settings.custom file allows you to specify most (but not all) configuration parameters.
There are some additional configuration parameters that you can configure at Dockerfile (located in your $KOP_INSTDIR)
The configuration is done at settings.custom file always take precedence over configuration done at Dockerfile.
| Component | PropertyName (=default value) | Meaning |
|---|---|---|
| TimeZone | KIUWAN_TIMEZONE='UTC' | Timezone to be used by the Kiuwan application. |
| WildFly | APPS_JVMMINMEMORY=512M | Max and Min amount of heap memory to be used by WidlFly. |
| APPS_JVMMINMETASIZE=96M APPS_JVMMAXMETASIZE=512M | Max and min ammount of perm gen memory to be used by WildFly | |
| MySQL | innodb_buffer_pool_size=2G | Default MySQL parameters used to create database instance. (see https://dev.mysql.com/doc/refman/5.6/en/ for reference) redis |
| Redis | KIUWAN_REDIS_MAXCLIENTS=100 | Maximum number of Redis clients that could be handled simultaneously (https://redis.io/topics/clients) Max memory limit to be used by Redis server (https://redis.io/topics/config) |
Appendix 1 - Configuring Apache as FrontEnd WebServer to KOP
If you choose the Apache web server as the front-end for your Kiuwan On-Premises installation, you may follow the following configuration examples and/or check your current configuration agrees with the suggested examples.
HTTP Protocol
For this kind of access you just need to add a virtual host and configure how Apache will talk to Kiuwan.
Before this make sure your Apache installation has these modules available:
mod_proxy
mod_proxy_ajp (if you want ajp communication between front and backend servers)
mod_proxy_http (if you want ajp communication between front and backend servers)
mod_proxy_wstunnel
To add a virtual host for Kiuwan On-Premises, you can add a file in your Apache installation folder (i.e. /etc/apache2/sites-available/kop.conf) with the following content. Make sure you replace the variables put inside brackets for those you previously configured when installing your Kiuwan On-Premises instance and a protocol is set (choose between ajp or http) in the ProxyPass directives:
<VirtualHost *:[KIUWAN_WEBSERVER_PORT]>
	ServerName [KIUWAN_WEBSERVER_HOST]
	ServerAdmin webmaster@localhost
	DocumentRoot /var/www/html

	LogLevel debug
	ErrorLog ${APACHE_LOG_DIR}/error.log
	CustomLog ${APACHE_LOG_DIR}/access.log combined

	ProxyRequests Off
	ProxyPreserveHost On
	<Proxy *>
		Require all granted
	</Proxy>

	ProxyPass		/	[ajp|http]://[KIUWAN_HOST]:[KIUWAN_PORT]/
	ProxyPassReverse	/	[ajp|http]://[KIUWAN_HOST]:[KIUWAN_PORT]/

	<Location />
		Require all granted
	</Location>
</VirtualHost>
HTTPS Protocol
For this kind of access you will need:
A virtual host configured in Apache will talk to Kiuwan (see below).
Open an https port in Apache (usually 443).
A certificate for the exposed hostname (KIUWAN_WEBSERVER_HOST).
Before this make sure your Apache installation has these modules available:
mod_proxy
mod_proxy_ajp (if you want ajp communication between front and backend servers)
mod_proxy_http (if you want ajp communication between front and backend servers)
mod_proxy_wstunnel
mod_rewrite
mod_ssl
Please make sure you generate a certificate for your Kiuwan hostname and it is signed by a trusted CA inside your organization. At this point you need three files:
[KIUWAN_WEBSERVER_HOST].crt: the certificate for your kiuwan host.
[KIUWAN_WEBSERVER_HOST].key: the private key.
ca.crt: the trusted CA certificate.
Refer to PremisesInstallationGuide-Step5.2CreatethePrivatekeyandCertificateSigningRequest(CSR)foryourserver for more information on how to create and install certificates.
Please note that you must install the CA certificate on the docker container before proceeding.
Place the previous files at these locations (we put here the default locations for these files, but it is up to you to change these paths):
/etc/ssl/certs/[KIUWAN_WEBSERVER_HOST].crt
/etc/ssl/private/[KIUWAN_WEBSERVER_HOST].key
/etc/apache2/ssl.crt/ca.crt
Now you should tell Apache to listen on the configured https port, editing the ports.conf file (i.e. /etc/apache2/ports.conf):
Listen [KIUWAN_WEBSERVER_PORT]
To add a virtual host for Kiuwan On-Premises, you can add a file in your Apache installation folder (i.e. /etc/apache2/sites-available/kop.conf) with the following content. Make sure you replace the variables put inside brackets for those you previously configured when installing your Kiuwan On-Premises instance and a protocol is set (choose between ajp or http) in the ProxyPass directives:
<VirtualHost *:[KIUWAN_WEBSERVER_PORT]>
	ServerName [KIUWAN_WEBSERVER_HOST]
	ServerAdmin webmaster@localhost
	DocumentRoot /var/www/html

	SSLEngine on
	SSLCertificateFile /etc/ssl/certs/[KIUWAN_WEBSERVER_HOST].crt
	SSLCertificateKeyFile /etc/ssl/private/[KIUWAN_WEBSERVER_HOST].key
	SSLCertificateChainFile /etc/apache2/ssl.crt/ca.crt

	LogLevel debug
	ErrorLog ${APACHE_LOG_DIR}/error.log
	CustomLog ${APACHE_LOG_DIR}/access.log combined

	ProxyRequests Off
	ProxyPreserveHost On
	<Proxy *>
		Require all granted
	</Proxy>

	ProxyPass		/	[ajp|http]://[KIUWAN_HOST]:[KIUWAN_PORT]/
	ProxyPassReverse	/	[ajp|http]://[KIUWAN_HOST]:[KIUWAN_PORT]/

	<Location />
		Require all granted
	</Location>

	# Redirect http traffic to https
	RewriteEngine On
	RewriteCond %{HTTPS} off
	RewriteRule ^.*$ https://%{SERVER_NAME}%{REQUEST_URI} [R,L]

</VirtualHost>