Introduction
This page provides information on how to upgrade a Kiuwan On-Premises Distributed installation. Note that this guide only applies to Kiuwan On-Premises installations distributed installations done using the kiuwan-cluster tool.
Checking for new versions
Currently installed versions and latest available versions of Kiuwan On-Premises are shown in the System Administration Console. To access this page, log into your Kiuwan On-Premises installation as "sysadmin".
You should see the following page (note that versions may change between this screenshot and your installation):
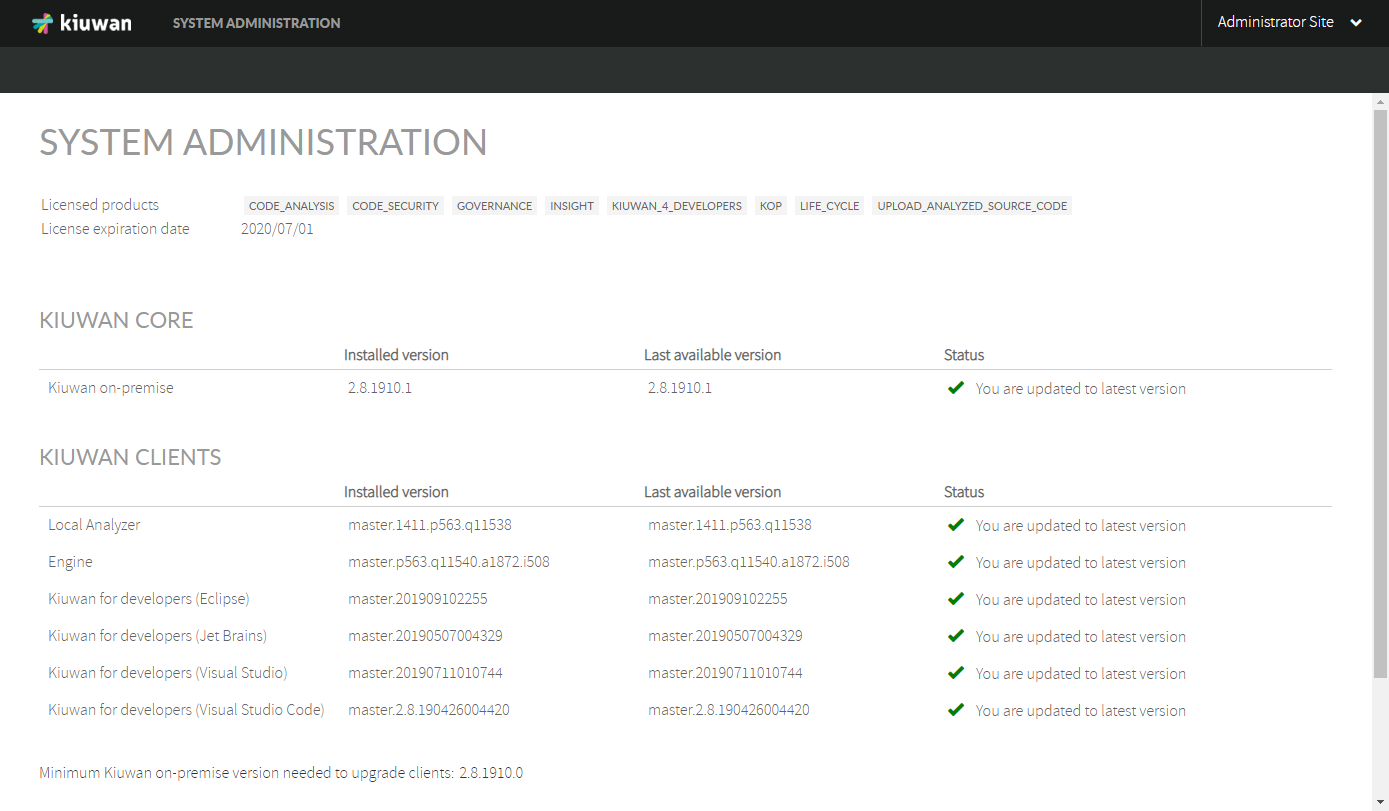
This table summarizes the meaning of the information shown in the previous screenshot:
| Meaning | |
|---|---|
| Kiuwan Core | Kiuwan On-Premises itself. This is the image version of your Kiuwan containers (front, analyzer and scheduler nodes). |
| Kiuwan Clients | Kiuwan On-Premises clients. These are the clients provided along with your current Kiuwan On-Premises installation. Sometimes clients may be updated without the need of a full Kiuwan On-Premises upgrade that includes Kiuwan Core. See Upgrading Kiuwan On-Premises (only clients) section for more information. |
| Installed version | This column shows the version name of the current installed versions (both for Kiuwan core and clients). |
| Last available version | This column shows the latest available version of Kiuwan core and clients. |
| Status | When a new version is detected this column will indicate that an upgrade is available. |
| Minimum Kiuwan On-Premises version needed to upgrade clients | If your current Kiuwan Core version is less than this version, new versions of Kiuwan On-Premises clients will not be available for your installation anymore. If you want to upgrade, it is mandatory to perform a full upgrade. See Upgrading Kiuwan On-Premises (full) section for more information. |
Upgrade modes
Kiuwan On-Premises clients are those Kiuwan products that your Kiuwan On-Premises servers will provide to your users:
- Kiuwan Local Analyzer
- Kiuwan Engine
- Kiuwan for developers IDE plugins or extensions (Eclipse, JetBrains, Visual Studio and Visual Studio Code).
There are more Kiuwan clients that you may need to upgrade, but are provided by external sources and you should follow the standard upgrade procedure of their platform:
- Kiuwan Jenkins plugin: downloadable from the Jenkins plugin repository.
- Kiuwan Microsoft TFS Azure extension: downloadable through the Azure DevOps marketplace.
Sometimes new versions of Kiuwan clients are published to fix bugs or include new features. If new versions of Kiuwan On-Premises clients are available and you want to upgrade your installation to make your Kiuwan On-Premises servers provide the latest available versions of each client, please follow this guide.
Do not mix up what a Kiuwan On-Premises client version is. These are different concepts:
- Client versions stored in your Kiuwan On-Premises servers: these are the versions that your Kiuwan On-Premises server provides to be downloaded and installed on your CI systems, development computers, etc. This versions are those shown in the System Administration Console.
- Client versions installed in your company's laptops, CI systems, etc.: these are the versions that were installed after your first Kiuwan On-Premises installation or subsequent upgrades. Once you upgrade your installation client versions, your company's computers may have old versions of Kiuwan On-Premises clients. The following steps address how to upgrade these as well.
Clients only mode
You can choose to upgrade only Kiuwan On-Premises clients as long as their latest versions are compatible with your currently installed Kiuwan core.
Full mode
You can choose to upgrade only Kiuwan On-Premises clients as long as their latest versions are compatible with your currently installed Kiuwan core.
Upgrade: common steps
Either you are upgrading only clients or performing a full upgrade, your must follow this steps before continuing.
Step 1: backup your current volumes
Just in case an unexpected error occurs during the upgrade process, it is convenient that your backup all your volumes before proceeding.
Step 2: check clients upgrade bypass configuration
To make sure that your current configuration is not ignoring new available clients, you should check if "kiuwan.clients.update" is set in the following file:
- [VOLUMES_DIR]/config-shared/globalConfig/globalConfig.properties
Locate the key "kiuwan.clients.update" at the end of the file and make sure it is set to true:
kiuwan.clients.update=true
When the flag is set to true, all Kiuwan clients will be updated as long as a new version is available.
Step 3: check the status of Kiuwan On-Premises infrastructure
To upgrade Kiuwan On-Premises it is mandatory that at least these elements of the provided infrastructure are up and running:
- MySQL
- Redis cluster
If you have run any of the provided scripts that stop this infrastructure elements, please make sure you start them before proceding to upgrade.
Upgrade: clients only mode
Note that it is safe to update Kiuwan On-Premises clients WITHOUT stopping any of the provided services or containers, but make sure you have checked the Step 3 of the common steps before proceeding.
Step 1: run the clients upgrade
Open a terminal to the host where you downloaded and run the kiuwan-cluster tool to install Kiuwan On-Premises and change the directory to where the tool was untared (this directory is referred as [INSTALLER_DIR] in the Kiuwan On-Premises Distributed Installation Guide). Once the current directory is [INSTALL_DIR], execute this command:
sudo ./update-clients.sh
Upgrade: full mode
Note that a full upgrade will update your Kiuwan On-Premises clients as well, so there is no need to run the clients upgrade when performing a full upgrade.
This process will stop all Kiuwan services. This means that during the upgrade process:
- Users will not be able to access Kiuwan On-Premises web application.
- Analyses can be still run and will be queued until the new version is available.
Step 1: keep your old kiuwan-cluster installer
Step 2: download kiuwan-cluster latest version
Step 3: check if you need to follow specific steps for your Kiuwan On-Premises version
Step 4: run the full upgrade
Checking your Kiuwan On-Premises clients installations after upgrading
Once the update process is finished, all the published clients in your Kiuwan On-Premises installation will be ready to be downloaded. Check the specific client guide to see how to upgrade each client installation:
- Kiuwan Local Analyzer: upgrades automatically when started whenever your Kiuwan On-Premises servers provide a new version to download.
- Kiuwan Engine: upgrades automatically from Kiuwan Local Analyzer, as long as your Kiuwan On-Premises servers provide a new version and your engine is not frozen (see Engine documentation for more information on this topic).
- Kiuwan for developers:
- Eclipse: check Kiuwan for Developers for Eclipse-based IDEs user guide.
- JetBrains: check Kiuwan for Developers for JetBrains user guide.
- Microsoft Visual Studio: check Kiuwan for Developers for Microsoft Visual Studio user guide.
- Microsoft Visual Studio Code: check Kiuwan for Developers for Microsoft Visual Studio Code user guide.
- Kiuwan Jenkins plugin: check Jenkins plugin user guide.
- Kiuwan TFS extension: check Microsoft TFS-Azure DevOps Extension user guide.
Specific upgrade notes
This section provides information that you may need to follow in case you are upgrading one of these specific versions (see Checking for updates section if you want to check which version is installed in your company):
| Kiuwan On-Premises version | Specific upgrade process needed |
|---|---|
| 2.8.1910.1 | YES |
Upgrading from Kiuwan On-Premises 2.8.1910.1
If you have currently installed Kiuwan On-Premises version 2.8.1910.1, you will need to follow this guide in order to adapt your Kiuwan On-Premises infrastructure to the latest version.
Due to changes in how Redis Cluster is created through the installation process, in order to keep your installation up to date with the latest infrastructure you will need to follow a different approach to perform a full upgrade from this version.
You will need both the kiuwan-cluster version you used to install 2.8.1910.1 and the latest available kiuwan-cluster (that can be downloaded here https://static.kiuwan.com/download/onpremise/kiuwan-cluster.tar.gz). We will refer to this locations:
- [INSTALL_DIR_OLD]: where the old kiuwan-cluster version was untared.
- [INSTALL_DIR]: where the new kiuwan-cluster version has been untared.
Step 1: stop kiuwan services
*stop-kiuwan.sh (version vieja)
Step 2: update your current configuration
*update.sh (version nueva)
Step 3: prune current containers
*uninstall.sh (version nueva)
Step 4: clean Redis cluster data
*Borrar los datos del redis antiguo (data-local/Redis/data/**).
Step 5: update Redis cluster node information
*Cambiar en el fichero globalConfig.properties las direcciones de los nodos de redis.
redis.cache.nodes=172.17.0.1:6379,172.17.0.1:6380,172.17.0.1:6381,172.17.0.1:6382,172.17.0.1:6383,172.17.0.1:6384
redis.store.nodes=172.17.0.1:6379,172.17.0.1:6380,172.17.0.1:6381,172.17.0.1:6382,172.17.0.1:6383,172.17.0.1:6384
Step 6: modify the current configuration if needed
---Si se quiere modificar alguna otra propiedad, este es el momento.
Step 7: install current version
*install.sh (version nueva)