This section shows you how to integrate the Kiuwan IDE Plug-In into Eclipse-based IDEs.
The Kiuwan Plug-In for Eclipse IDEs is available in both Analyzer and Viewer mode.
Contents:
Introduction
Kiuwan allows for a true shift-left approach by integrating with all the main IDEs. Kiuwan for Developers is a plug-in for development IDEs that facilitates and automates compliance with security normatives, quality standards and best practices for several languages. It provides the following benefits: The Kiuwan IDE Plug-in monitors and reports on the security, quality, and efficiency of your code at the point that it is written. This immediate feedback provides you with the opportunity to improve your code before it is delivered.Kiuwan IDE Plug-In
Supported Eclipse-based IDEs
The Kiuwan IDE Plug-In has been successfully tested in following IDEs and minimum versions:
Eclipse: Luna (4.4)
RAD (Rational Application Developer for WebSphere): 9.5
IBM Rational Developer for i Systems: 9.5, 9.6
IBM Rational Developer for z Systems: 9.5.1
For others IDEs and versions, please contact Kiuwan Technical Support.
Note for Eclipse 2019-12 users (or following versions)
Due to changes in the Eclipse core, a special installation procedure is needed from Eclipse 2019-12.
Please follow these steps if your Eclipse version is equal or greater than 2019-12:
- Open the "Window" > "Preferences" dialog.
- Select "Install/Update" > "Available Software Sites" option.
- Click on the "Add..." button. A new dialog will be shown with two text fields.
- Set the "Name" field to "Eclipse Oxygen.2"
- Set the "Location" field to "http://download.oracle.com/otn_software/oepe/library/eclipse-oxygen.2"
- Click the "Add" button. This will add the defined software site to your list.
- Check the "Eclipse Oxygen.2" software site in the list if it is not already checked.
- Follow the standard installation instructions.
Requirements
The Kiuwan IDE Plug-In requires Java 8 or above (either JDK or JRE).
You may download it from http://www.oracle.com/technetwork/java/javase/downloads/index.html.
Please visit Installation and Network Configuration for further information.
Note for Linux/Unix users
If you are running Eclipse under Linux/Unix you can experience problems after installing the plug-in.
That's due to some well-known problems with GTK3 use by Eclipse distributions. Please visit the following links for further information.
- http://www.jroller.com/andyl/entry/mars_on_linux
- https://askubuntu.com/questions/761604/eclipse-not-working-in-16-04
- https://bugs.eclipse.org/bugs/show_bug.cgi?id=430736
To solve this issue, please modify eclipse.ini :
Add to your eclipse.ini:
--launcher.GTK_version
2
before the line:
--launcher.appendVmargs
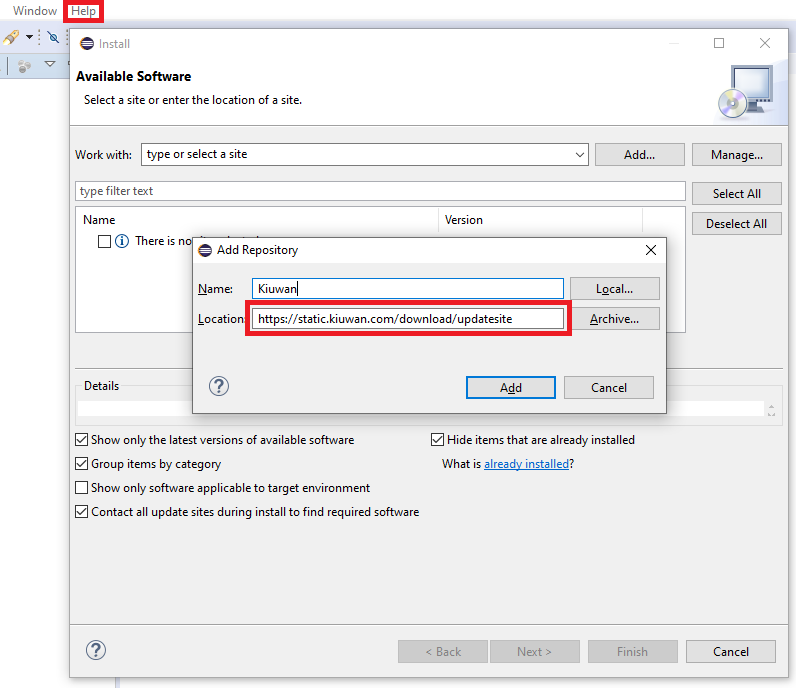
Installation
To install Kiuwan for Developers just follow the steps below:
| Steps | Image |
|---|---|
|  |
| 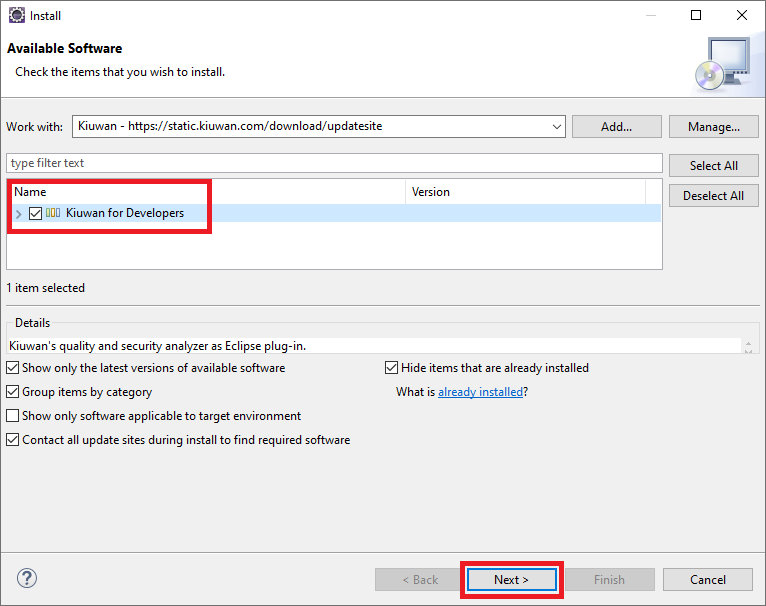 |
If the installation was successfully completed, Kiuwan for Developers will be up and running upon restart!
Updates
The Kiuwan IDE Plug-In checks automatically for updates on Eclipse startup and on a daily basis after that.
If you need to check it manually, you have two options:
- Through the standard Eclipse mechanisms, or
- Go to Windows > Preferences > Kiuwan and press the Check for updates button in Plug-in updates section.
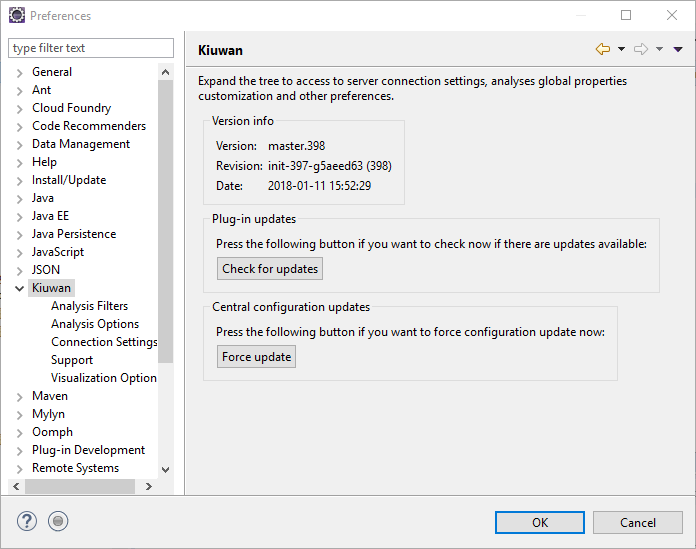
Although the central configuration is also automatically synchronized at IDE startup, it is possible to force its update using the Force update button in the Central configuration updates section.
Configuration
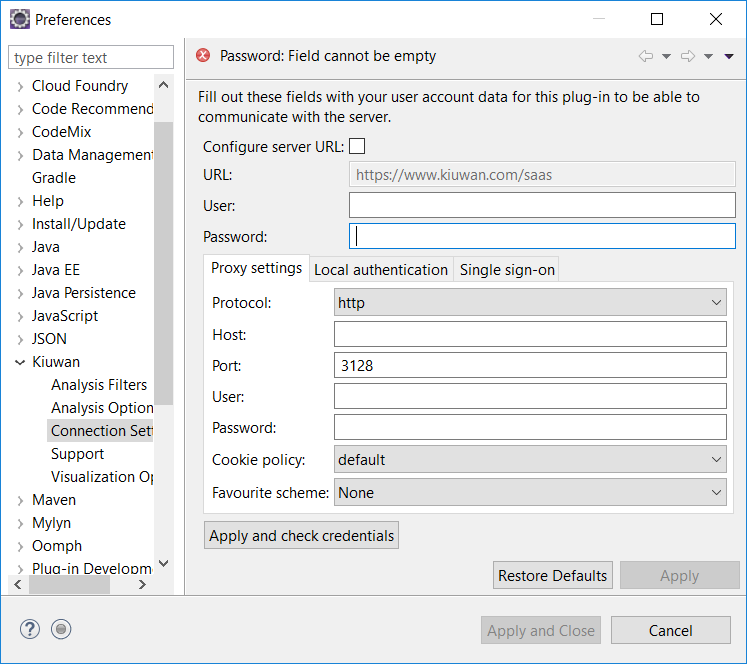
Connection Settings
After installation, you need to configure the Kiuwan Plug-In to connect to the Kiuwan servers.
| Steps | Image |
|---|---|
Find the connection settings under Windows > Preferences > Kiuwan > Connection Settings. Fill in the User and Password with those of your Kiuwan Account and click Apply and Check Credentials to validate access. In case you are using a proxy, please configure Proxy Settings. Do not change the default server URL (https://www.kiuwan.com/saas )
|  |
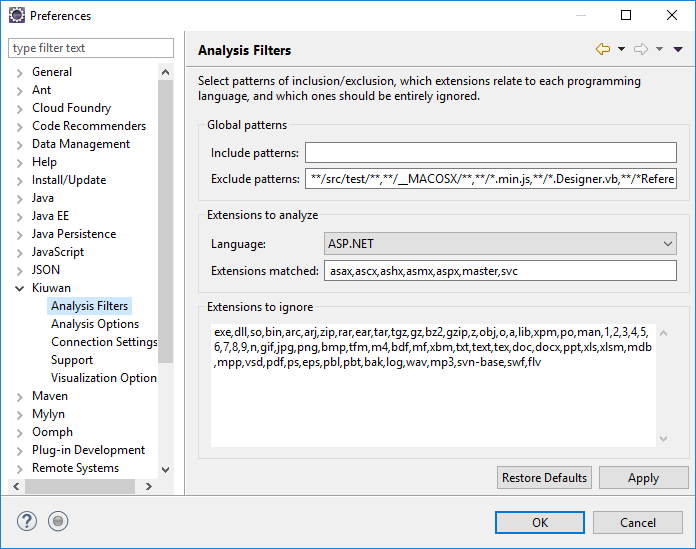
Analysis Filters
You can configure file inclusion and exclusion patterns for the analysis. Please visit Source Code Filters for further help on this.
Visualization Options
Under Visualization Options you can configure:
Automatic remote defects synchronization
If checked, the plug-in will automatically update the remote defects list when you select a project in Eclipse (mapped to a Kiuwan application) and that defects list is empty.
- Mark defects as 'potential match" ...
- In case the Kiuwan server reports a defect which source code text does not match the source within your Eclipse project, that defect is a "potential match"
- If checked, the plug-in will mark those defects as "potential match"

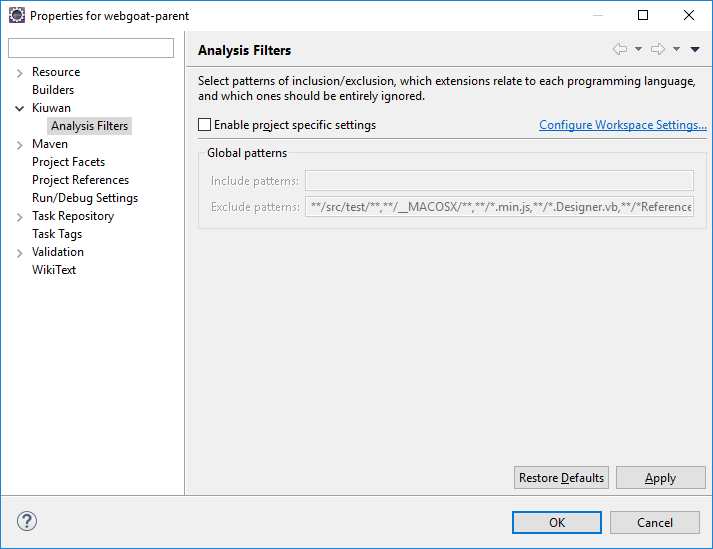
This configuration is general to the plug-in installation, but you can configure analysis filters per-application.
Go to Project > Properties > Kiuwan > Analysis Filters and check Enable project specific settings.
Map your Eclipse project to Kiuwan Application
After the Kiuwan IDE Plug-In is installed and the connection is configured, you are ready to map your Eclipse project to a Kiuwan application.
To map your Eclipse project to Kiuwan:
- Go to Project > Properties
- Right-click on your project and select Configure > Convert to Kiuwan Project...
- Right-click on your project and select Properties.
The following dialog will open.
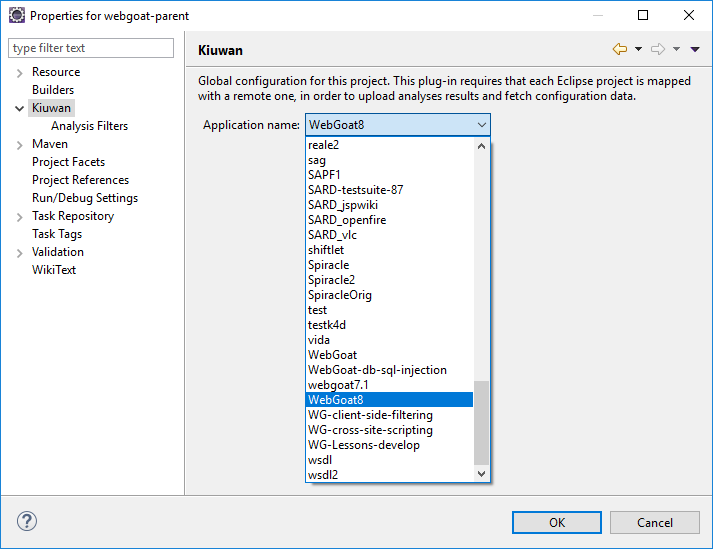
Mapping your Eclipse project to a Kiuwan Application allows executing a plug-in analysis synced to the Kiuwan Model defined at the application level.
This means that the plug-in analysis will be executed with the same Model (rules, configuration, etc.) defined for the Kiuwan application.
Please visit Models Manager User Guide for further help on Kiuwan Models.
Also, mapping your project to a Kiuwan Application allows you to download the defect list found by Kiuwan servers to Eclipse, so you can work locally on fixing those defects.
Kiuwan Plug-In execution modes
The Kiuwan Plug-In can be configured to run in different execution modes:
- Manual
- You manually invoke the Kiuwan analysis
- Automatic
- Kiuwan analysis is executed automatically upon changes in the code.
By configuring the plug-in, you can decide when Kiuwan will be executed and which files will be analyzed.
Analysis permissions
To be able to analyze in Eclipse, your Kiuwan user must have been configured with, at least, read permission on the Kiuwan application
Manual analysis
If your Eclipse project is NOT configured to "Build Automatically", Kiuwan will only run on-demand.
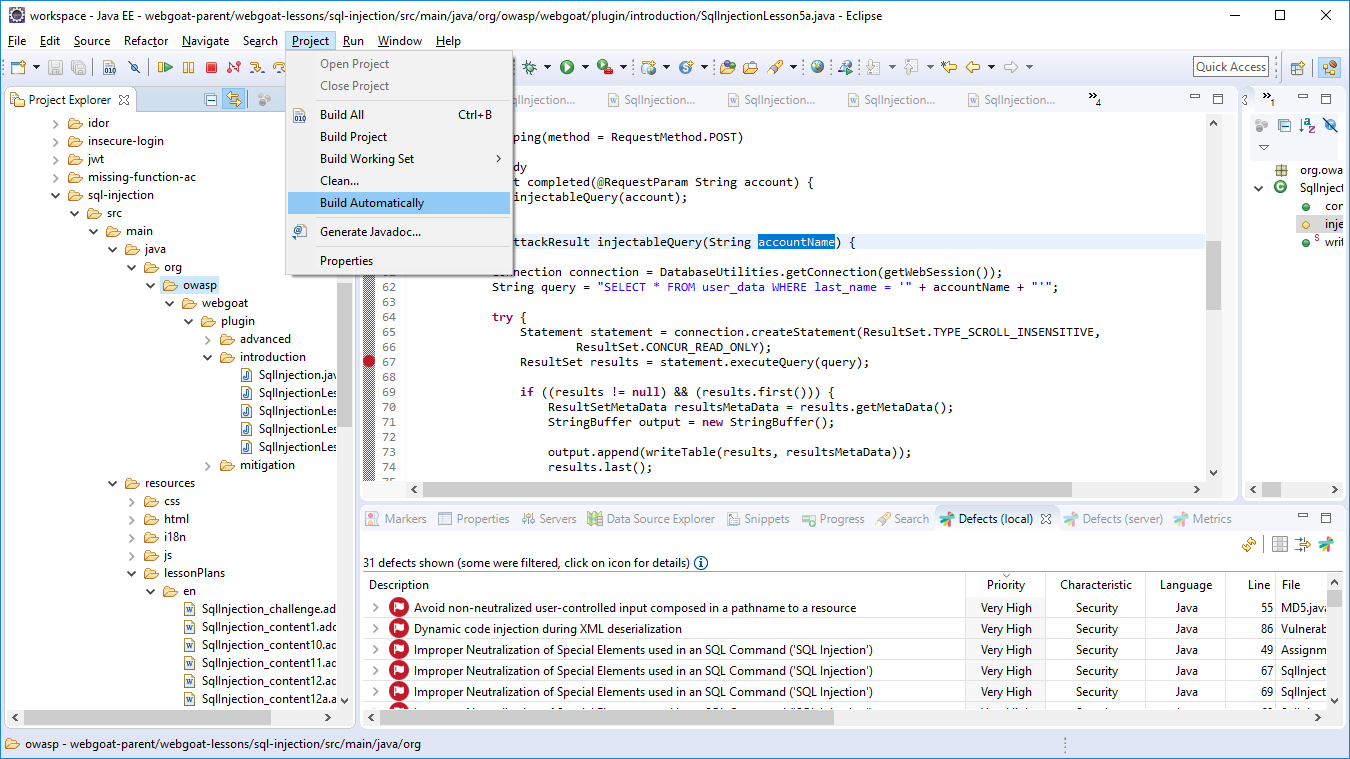
In this case, to manually execute the analysis, left-click on the selected item (file, folder, project) and select Run Kiuwan Analysis. Kiuwan will then execute the analysis on the selected item(s).
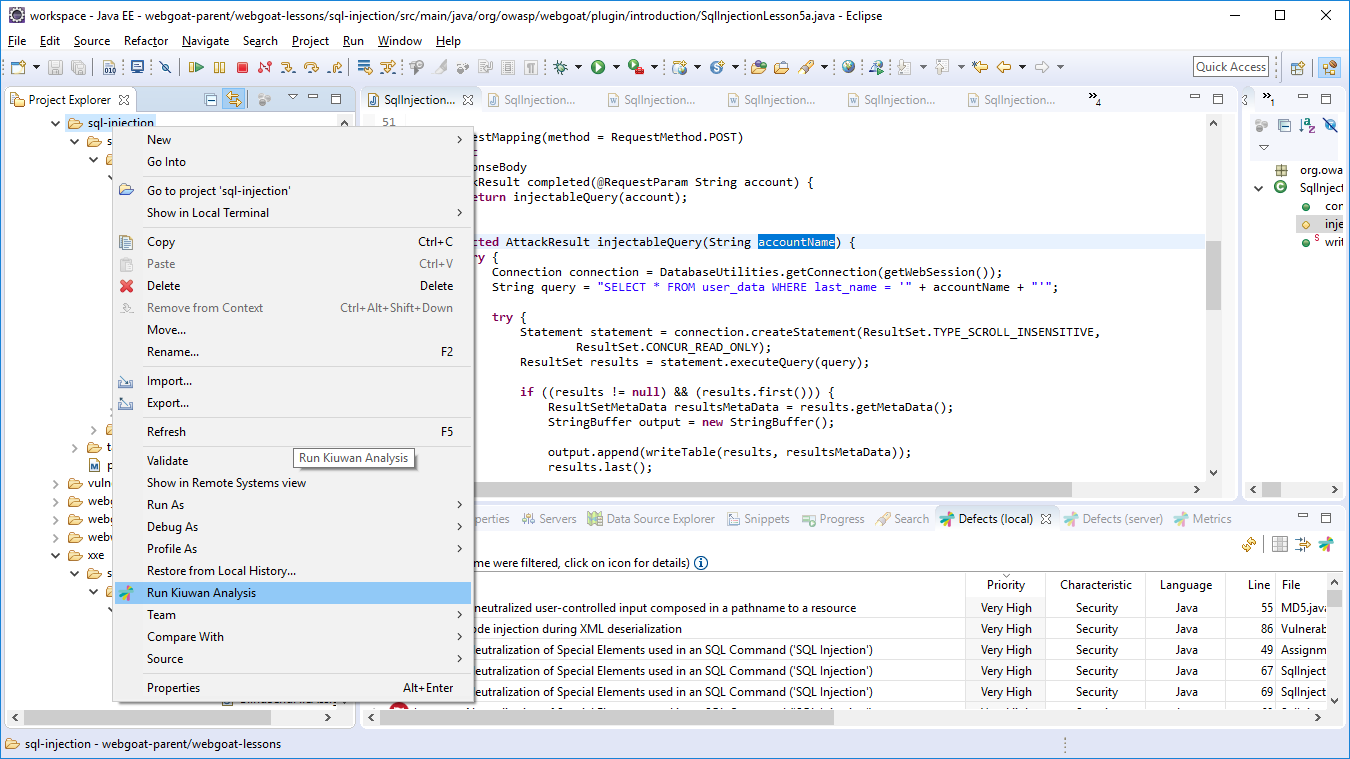
Automatic analysis
If your Eclipse project is configured to Build Automatically, Kiuwan will run automatically and you can configure when the analysis will run and on what files.
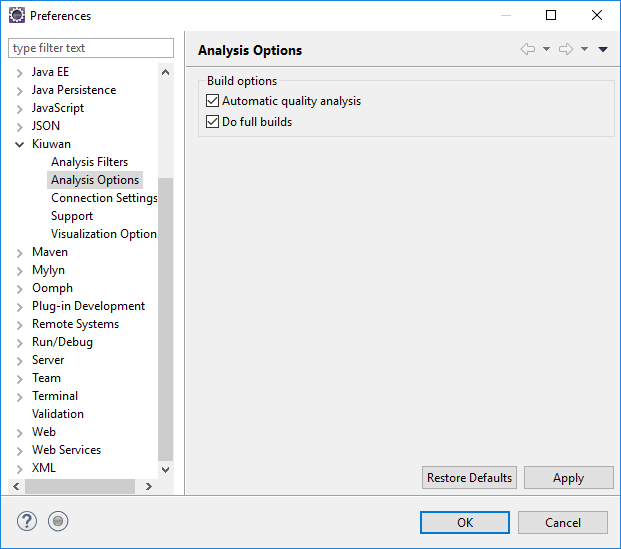
The Kiuwan IDE Plug-In execution mode is configured at Window > Preferences > Kiuwan > Analysis Options
If your Eclipse project is configured to "Build Automatically and "Automatic quality analysis" is checked:
Kiuwan will analyze a file after you save the file. Only the selected file will be analyzed.
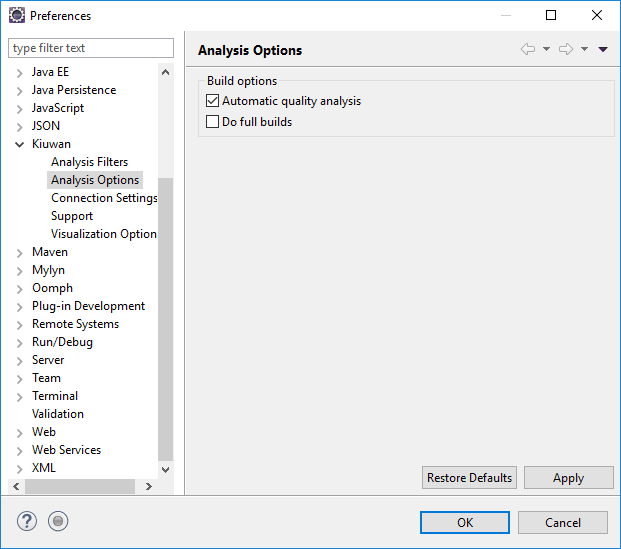
Build options - Do full builds
If your Eclipse project is configured to Build Automatically and Do full builds is checked:
Kiuwan will analyze the complete project when you Clean the project.
Please note that this option is only available if Automatic quality analysis is checked.
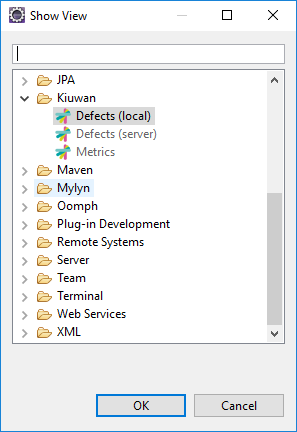
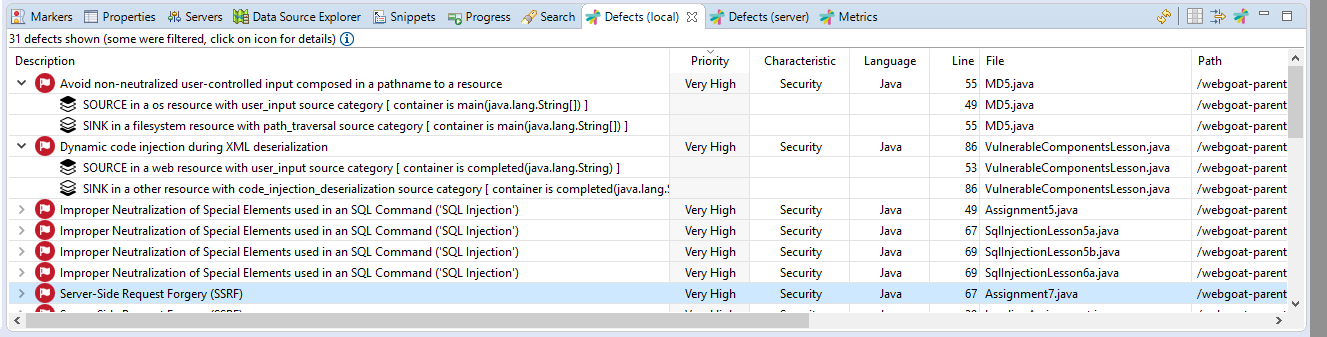
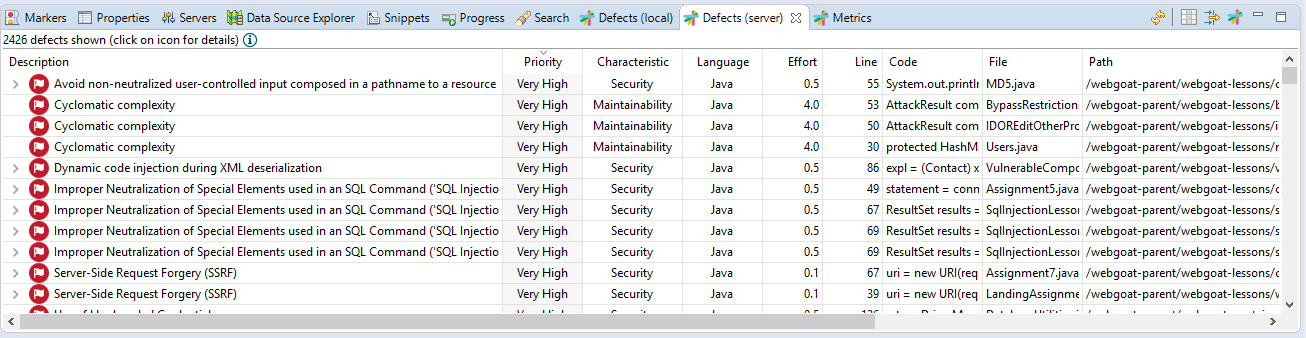
Kiuwan IDE Plug-In Defects List
To view the analysis' defects list, go to Window > Show View > Other > Kiuwan
Local defects list
The local defects list displays defects found during local analysis executed within your Eclipse.

Double-click on a defect to open the associated file in the Eclipse editor. The cursor will be placed on the affected line.
Right-click on a defect to inspect the Rule information of a defect to better understand it. (A browser will open to display the Rule Information page. You may be asked for your Kiuwan credentials.)
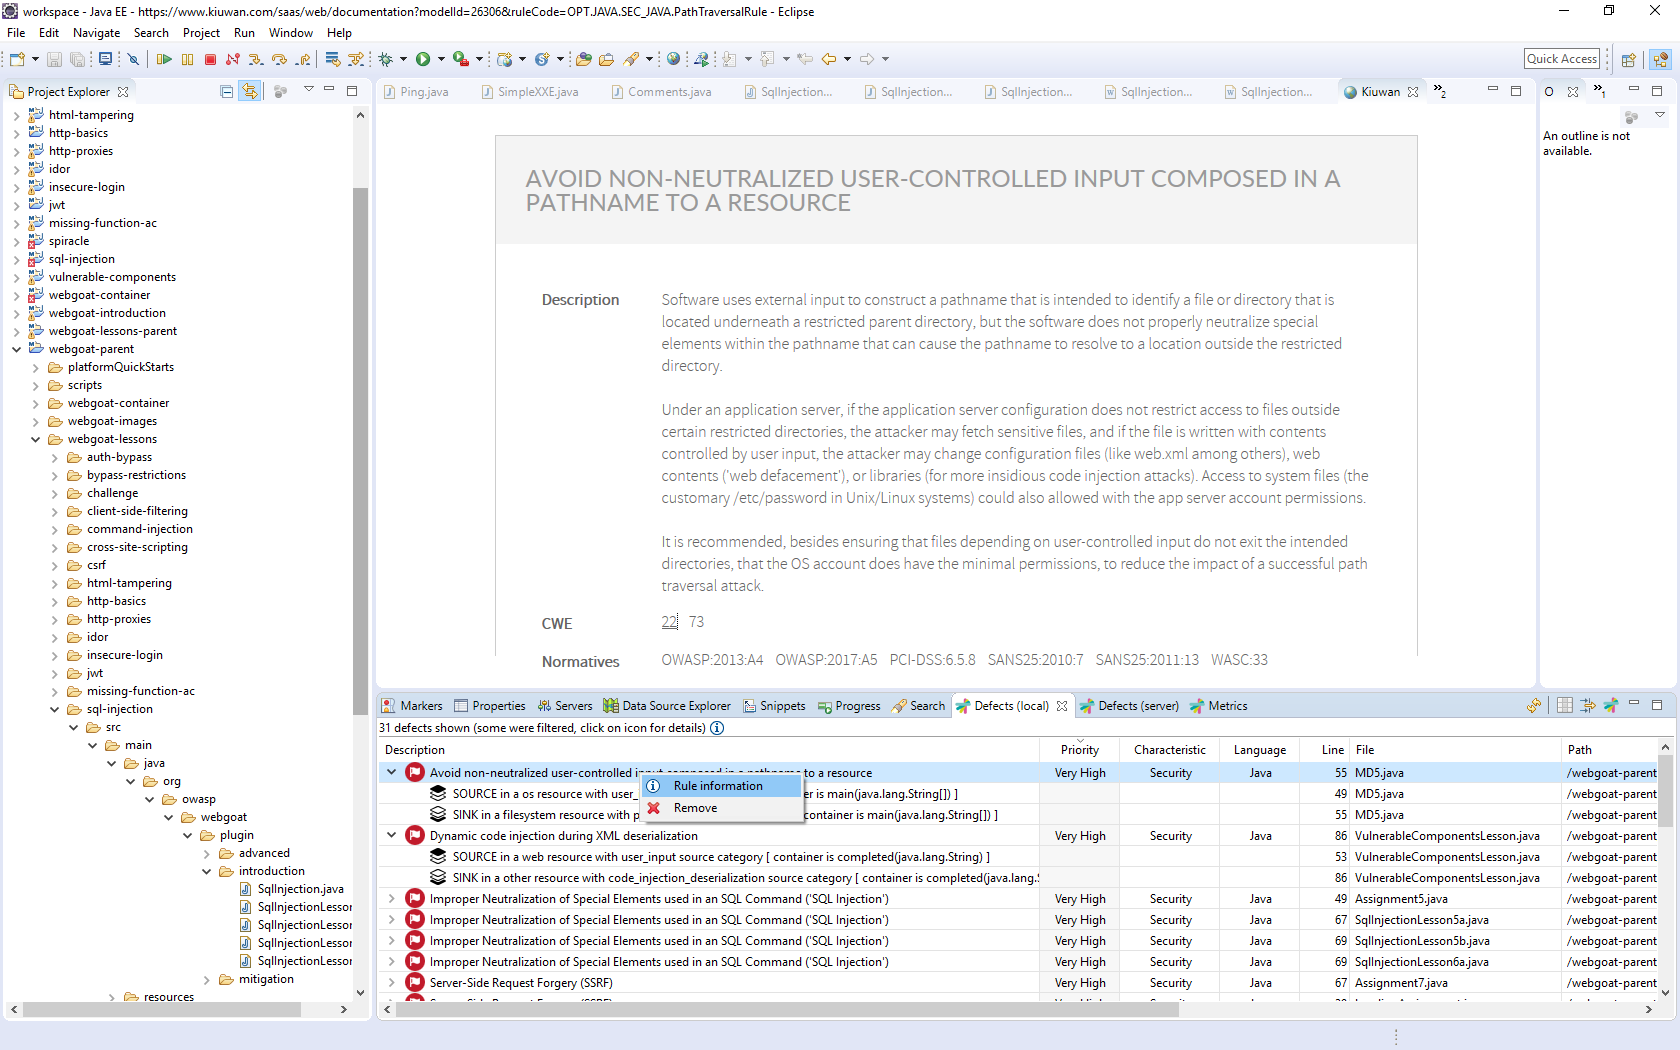
Vulnerabilities details (Source and Sink)
Security defects (i.e. vulnerabilities) are prefixed by a > icon.
Clicking the > icon will open details on associated Source and Sink of the defect.
Local Analysis Configuration
The Kiuwan IDE Plug-In will execute the analysis with the rules contained into the model associated to the mapped Kiuwan application.
But it also allows you to reduce the scope of the analysis to a subset of that model.
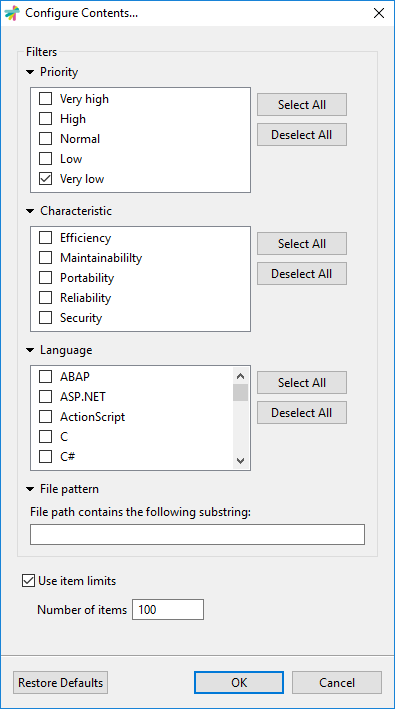
When you execute the local analysis on your Eclipse project, the number of defects can be quite large. If you are not going to work on all of them, you should consider reducing the analysis to let you concentrate on the most important subset of defects. The Kiuwan IDE Plug-In allows you to configure the local analysis to only report defects based on Priority, Characteristic, Language or even a subset of a file (based on file path substring)
This would allow you to concentrate on a specific set of rules or files, reducing the number of defects that appear in the list. Only those defects matching the filters will be displayed.
Max number of defects
An important point is to set a limit for the number of defects displayed in the list.
It's set to 100 by default. You can increase such limit, but performance of your Eclipse can be seriously damaged. Take care not to set that limit to a high number.
You can access the Local Analysis Configuration by clicking on the  icon of the Local Defects list.
Note: All the options unchecked are equivalent to all checked.
Configuring Defects View
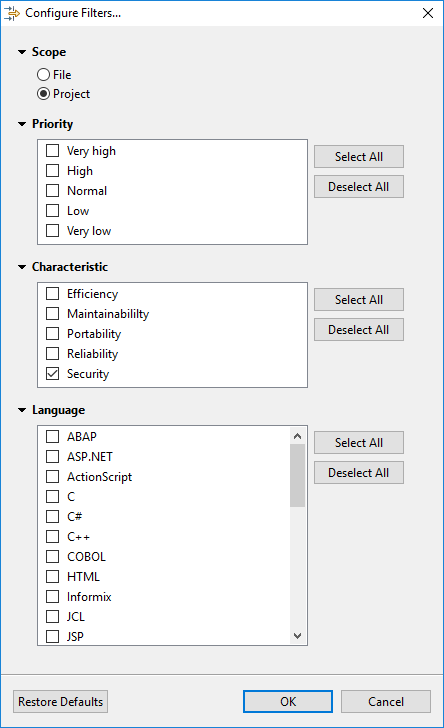
Regardless of you have configured the subset of defects of K4D analysis (see above), you can further reduce the defects view by defining additional filtering conditions.
The most important filter is Scope:
- File option will only display defects of the selected file in the Eclipse source file editor
- Project option will display the defects of the entire project
Additionally, you can define filters based on Priority, Characteristic and Language.
Click the  icon of Local Defects listDefine to view filters.
Note: All the unchecked options are equivalent to all the checked ones.
Server defects list
The server defects list displays defects of the application stored in the Kiuwan servers.
This utility allows developers to download defects found during the Kiuwan analysis of the application in a centralized environment.
- Your current source code could be different from the source code of the server (you or others might have already modified that version)
- The list of defects to be fixed will be most probably a subset of all defects found during the server analysis (more on this topic below)
In these cases, you will need to have access to server defects.
Source of Server defects list
- Last baseline analysis
- All the defects found during last complete application analysis (i.e. the Application Baseline)
- Action plan
- Defects included within an Action Plan (you can select the plan from the app's list of available action plans)
- Audit Delivery
- Defects that must be fixed so the Audit of the delivery can be successful (you can select the delivery among the list of executed deliveries)
Please, visit Kiuwan Life Cycle documentation for a full explanation of Baseline, Delivery and Audit concepts).
Click the icon of the Server Defects list to access the Source of Server Defects.
Note: All the unchecked options are equivalent to all the checked ones.
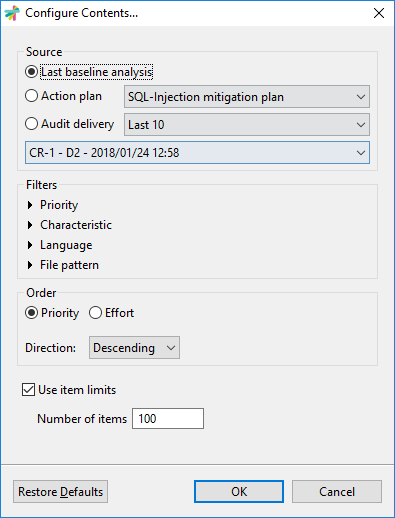
Filter server defects to download based on Priority, Characteristc, Language or File Pattern, and to configure the source of server defects.
Max number of defects
An important point is to set a limit for the number of defects displayed in the list.
By default, it's set to 100. You can increase such limit, but the performance of Eclipse can be seriously damaged. Do not to set that limit to a high number.
Configuring Filters
Besides to configure source and filters, you can further reduce the server defect list by defining additional filtering conditions.
Click the icon of the Server Defects list to define view filters.
Note: All the unchecked options are equivalent to all the checked ones.
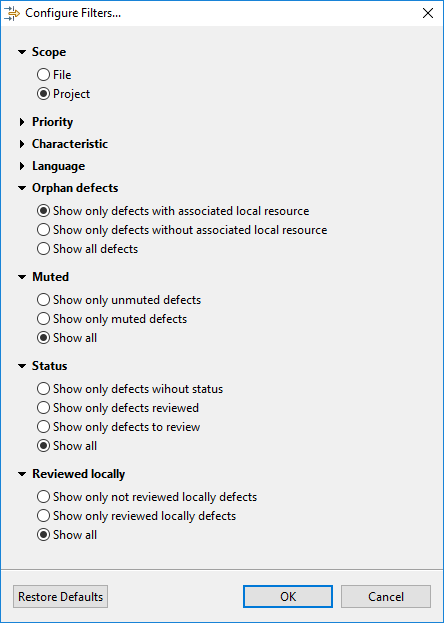
| Filter | Description |
|---|---|
| Scope | File = Only display defects of the selected file in the Eclipse source file editor Project = Display the defects of the entire project |
| Orphan defects | Display only those defects matching your current source code (defects with the associated local resource) or those that don't (defects without associated local resource), or all of them. |
| Muted | Display a server defect could have been muted (for example, because it's a false positive or because it's a so special condition that must not be fixed). |
| Life Cycle Status | To Review, Reviewed, or None When server defects are downloaded, you can filter defects based on their status. |
| Reviewed Locally | If you work on a to-review server defect, right-clicking on the defect you can "Mark as reviewed locally" that defect (see image below).
Then, that defect will be marked as Reviewed locally
|


Additionally, you can define filters based on Priority, Characteristic and Language.
Support and Troubleshooting
If you experience problems with the Kiuwan plugin for Eclipse, you can read Kiuwan Troubleshooting to find a solution, or if you prefer you can collect troubleshooting information and send it to us.
Support Information
Important information for troubleshooting is scattered across several log and configuration files.
To make this process easier to you, just go to Window > Preferences > Kiuwan > Support and press the Extract support data button.
Choose the folder where you want to save this information, and submit to our technical support team the compressed file generated there.
Visit Contact Kiuwan Technical Support on how to contact us. We will address your problem as soon as possible.