In this guide, we will explain in-depth the different features for navigating through AST in different ways.
For XPath API, read more here: XPath API
Contents:
| Table of Contents |
|---|
Basic navigation: BaseNode BaseNode and TreeNode
In our rule’s visit method, we have access to a BaseNode type type object (com.als.core.ast.BaseNode interface interface). This object represents the AST root node in which the source code we are analyzing has become, and it is the starting point from which to seek the informacion information needed to determine whether if the code shows code shows a violation of the standard to be certified.
To browse through the nodes, we have the TreeNode class class (com.als.core.ast.TreeNode), which is an implementation of BaseNode. Therefore, wwe we can turn our BaseNode nodes into TreeNode and vice versa at any time.
BaseNode <–> TreeNode conversion
| Code Block | ||
|---|---|---|
| ||
import com.als.core.AbstractRule;
import com.als.core.RuleContext;
import com.als.core.ast.BaseNode;

public class MyDummyRule extends AbstractRule {
  @Override
  protected void visit (BaseNode root, final RuleContext ctx) {
    // rule body...
  }
} |
protected void visit (BaseNode root, final RuleContext ctx) {
  TreeNode rootTNode = TreeNode.on(root);  // BaseNode to TreeNode
  BaseNode otherBNode = rootTNode.get();   // TreeNode to BaseNode
}
TreeNode type TreeNode type objects provide us almost unlimited ways to move all along the AST, looking looking for sibling, descendant or ancestor of any level nodes and meeting the specific characteristics we want. Among the most useful methods, we we have:
- child: searchs it searches between “child” nodes nodes (level 1 descendants of a node).
- find: searchs it searches inside the subtree in the current node node (level ‘n’ descendants of a node).
- parent: it returns the current node’s parent.
- ancestor: searchs it searches among all the ancestors of the current node.
- rightSibling / leftSibling: it returns the node immediately to the right/left of the current node.
Checking conditions in the nodes: TreeNode and NodePredicate
Other TreeNode objects objects functionalities, not directly related to navigation, but very useful, are:
- count: it counts the number of nodes of a certain type in the subtree in the current node.
- countAncestors: it counts the number of nodes of certain type among the ancestors of the current one.
- findImage: it returns the node image (usually, the concrete item of the source code under analysis, which is represented by the current node).
- findLine: it returns the number of line lines of the node (corresponding to the line number within the file of the source code under analysis in which the concrete item is, which is represented by the current node).
- has: it checks if there is a node in the subtree within the current node.
- hasAncestor: it checks if there is a node among the ascendants of the current node.
- hasChildren: it checks if there is a node among the children (level 1 descendants) of the current node.
- isLeaf / isRoot: it checks if the current node is a leaf or the root node.
- isNull / isNotNull: it checks if the current object is a null node (very useful for testing after search operations, since those can return TreeNode.NULLTREE, NullNode.NULL o o null objects when they do not find a node that meets the specified conditions).
- isTypeName: to check it checks the current node’s type.
Most search methods allow arguments to establish specific conditions that the nodes to search should meet. These conditions may be as simple as “the “the node must be of a certain type” type” or something like “the “the node must be of a certain type, and have a certain image, and be descendant/ancestor of…“of…“.
For these cases, we can define a NodePredicate (com.als.core.ast.NodePredicate) object:
NodePredicate sample:
| Code Block | ||
|---|---|---|
| ||
NodePredicate nodeToFind = new NodePredicate {
  public boolean is(BaseNode node) {
    TreeNode tNode = TreeNode.on(node);
    return tNode.isTypeName("MethodDeclaration") &&
      tNode.findImage().equals("methodName") &&
      tNode.hasAncestor("InterfaceDeclaration");
  }
};

@Override
|
protected void visit (BaseNode root, |
final RuleContext ctx) { TreeNode methodDeclar = TreeNode.on(root).find(nodeToFind); } |
Navigation within the navigation: TreeNode and NodeVisitor
We have already mentioned in a previous post the visitor strategy, with which we could go all along an AST nodes from a given one, using the accept methods provided by TreeNode.
Visitor strategy:
| Code Block | ||
|---|---|---|
| ||
import com.als.core.ast.TreeNode;
import com.als.core.ast.NodeVisitor;

public class MyDummyRule extends AbstractRule {
  @Override
  protected void visit(BaseNode root, final RuleContext ctx) {
    // this 'visit' is executed on each one of the source code files under analysis
    TreeNode.on(root).accept(new NodeVisitor() {
      public void visit(BaseNode node) {
       // this 'visit' is executed on each one of the nodes in the AST of the current file under analysis
     // ...
    }
  });
 }
} |
We can apply the same strategy, using the NodeVisitor objects (com.als.core.ast.NodeVisitor), to any subtree within the tree we are dealing with:
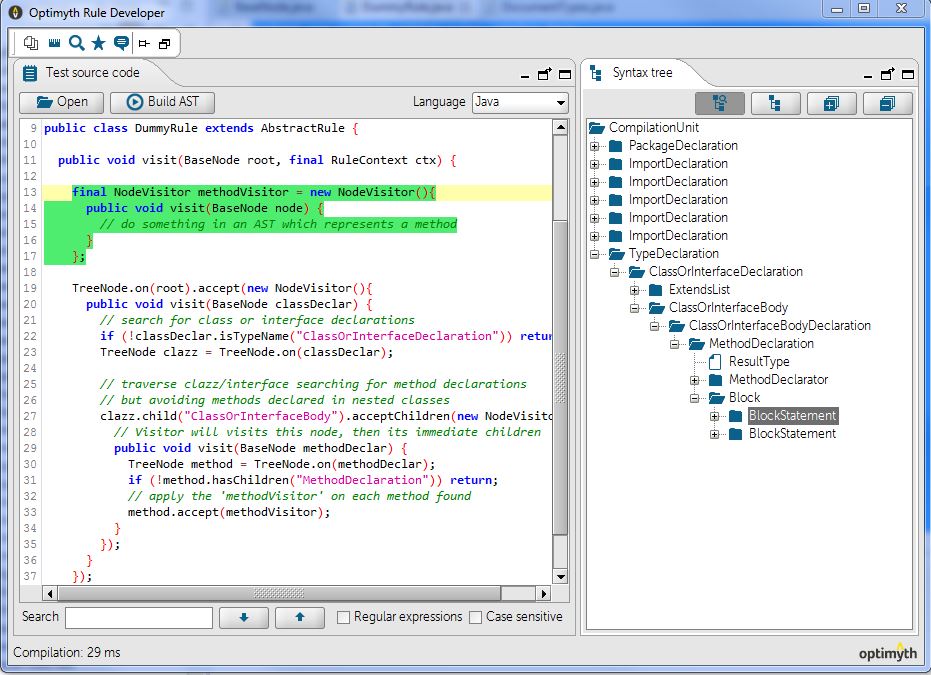
Applying Visitor:
| Code Block | ||
|---|---|---|
| ||
@Override
public void visit(BaseNode root, final RuleContext ctx) {

final NodeVisitor methodVisitor = new NodeVisitor(){
  public void visit(BaseNode node) {
    // do something on an AST which represents a method
  }
};

TreeNode.on(root).accept(new NodeVisitor(){
  public void visit(BaseNode classDeclar) {
    // search for class or interface declarations
    if (!classDeclar.isTypeName("ClassOrInterfaceDeclaration")) return;
    TreeNode clazz = TreeNode.on(classDeclar);
    // traverse clazz/interface searching for method declarations
    // but avoiding methods declared in nested classes
    clazz.child("ClassOrInterfaceBody").acceptChildren(new NodeVisitor() {
    // Visitor will visits this node, then its immediate children
    public void visit(BaseNode methodDeclar) {
      TreeNode method = TreeNode.on(methodDeclar);
      if (!method.hasChildren("MethodDeclaration")) return;
      // apply the 'methodVisitor' on each method found
      method.accept(methodVisitor);
      }
    });
   }
 });
} |
High-Level AST and LowAST and Low-Level AST
You may have noticed, working with our tool Kiuwan with Kiuwan Rule Developer, that the nodes types of the generated AST vary depending on the language of the source code we are analyzing. Therefore, this
This is something you should always keep in mind when developing your rules: each rule will be specific for the analysis of a particular programming language.
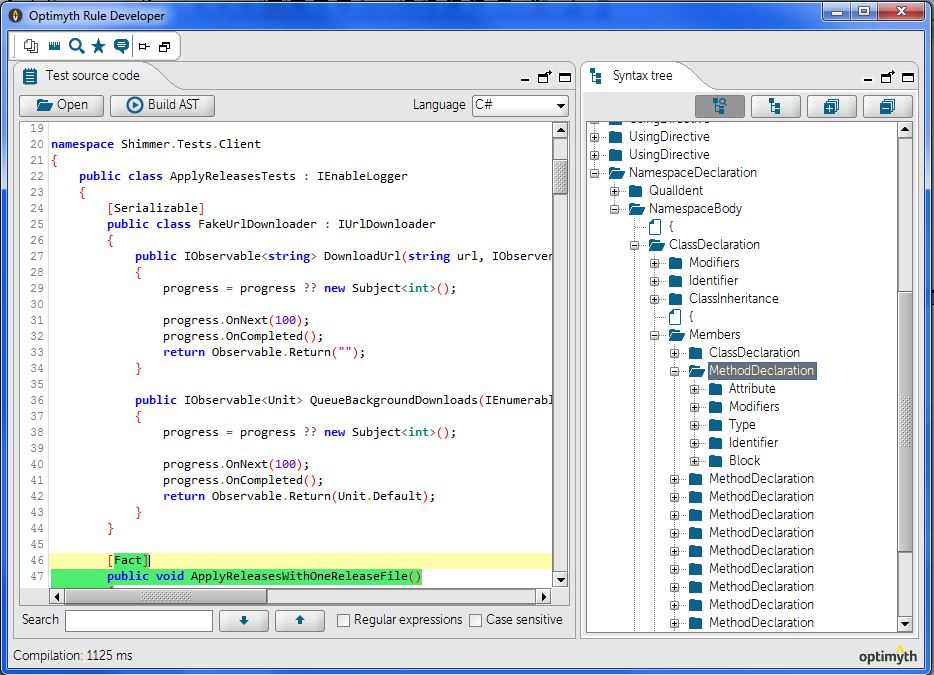
The nodes that Kiuwan Rule Developer shows shows us by default are the low-level nodes, Low-Level AST, which show in detail each one of the processed code elements. However, for certain rules, perhaps it is not necessary so much detail and it would be enough with a somewhat higher abstraction.
Therefore, with certain technologies (Java, C++, C#, Cobol, Javascript), we can access the high-level nodes, High-Level AST, representing elements to a less detailed level. To see one level of abstraction or the other, in in Kiuwan Rule Developer‘s ‘Syntax Syntax Tree‘ tab tab, we can find ‘Full Tree’ and ‘Summarized Tree’find Full Tree and Summarized Tree options (only available in those technologies that support them).

With ASTSwitcher (com.optimyth.qaking.highlevelapi.ast.util.ASTSwitcher) utility, we can convert low-level nodes into high-level ones and vice versa.
Low-Level AST <–> High-Level AST conversion
| Code Block | ||
|---|---|---|
| ||
protected void visit |
(BaseNode root, |
final RuleContext ctx) { TreeNode lowLevelNode = TreeNode.on(root); |
// BaseNode to TreeNode TreeNode highLevelNode = ASTSwitcher.getHighLevelNode(lowLevelNode); lowLevelNode = ASTSwitcher.getLowLevelNode(highLevelNode); } |
As achieve perfection at the first attempt is often complicated, we remind you that you have the possibility to debug the implementation of your rules. Check Guillermo Simmross’ post about it for further information. To expand and consilidate the concepts we have written about, please consult the documentation in development\doc directory of Kiuwan Local Analyzer distribution.
We invite you to keep visiting us to continue exploring the capabilites provided for developing your KIUWAN rules.
Let’s continue with our series of posts on rules development for KIUWAN.
In a previous post, we explained that the implementation of our rules consisted of a java class that meet certain characteristics, including a visit method where the rule main functionality is made, that is visiting the nodes of the AST object (Abstract Syntax Tree) to retrieve information confirming the existence of a violation and reporting the violation in that case.
We have different API and features, provided by the product, useful for navigating through the AST in different ways, so we’ll start to explain some of them, mainly through concrete implementation examples, for better learning.
Basic navigation: BaseNode and TreeNode
In our rule’s visit method, we have access to a BaseNode type object (com.als.core.ast.BaseNode interface). This object represents the AST root node in which the source code we are analyzing has become, and it is the starting point from which to seek the informacion needed to determine whether if the code shows a violation of the standard to be certified.
To browse through the nodes, we have the TreeNode class (com.als.core.ast.TreeNode), which is an implementation of BaseNode. Therefore, wwe can turn our BaseNode nodes into TreeNode and vice versa at any time.
TreeNode type objects provide us almost unlimited ways to move all along the AST, looking for sibling, descendant or ancestor of any level nodes and meeting the specific characteristics we want. Among the most useful methods, we have:
- child: searchs between “child” nodes (level 1 descendants of a node).
- find: searchs inside the subtree in the current node (level ‘n’ descendants of a node).
- parent: returns the current node’s parent.
- ancestor: searchs among all the ancestors of the current node.
- rightSibling / leftSibling: returns the node immediately to the right/left of the current node.
Checking conditions in the nodes: TreeNode and NodePredicate
Other TreeNode objects functionalities, not directly related to navigation, but very useful, are:
- count: counts the number of nodes of a certain type in the subtree in the current node.
- countAncestors: counts the number of nodes of certain type among the ancestors of the current one.
- findImage: returns the node image (usually, the concrete item of the source code under analysis, which is represented by the current node).
- findLine: returns the number of line of the node (corresponding to the line number within the file of the source code under analysis in which the concrete item is, which is represented by the current node).
- has: checks if there is a node in the subtree within the current node.
- hasAncestor: checks if there is a node among the ascendants of the current node.
- hasChildren: checks if there is a node among the children (level 1 descendants) of the current node.
- isLeaf / isRoot: checks if the current node is a leaf or the root node.
- isNull / isNotNull: checks if the current object is a null node (very useful for testing after search operations, since those can return TreeNode.NULLTREE, NullNode.NULL o null objects when they do not find a node that meets the specified conditions).
- isTypeName: to check the current node’s type.
Most search methods allow arguments to establish specific conditions that the nodes to search should meet. These conditions may be as simple as “the node must be of a certain type” or something like “the node must be of a certain type, and have a certain image, and be descendant/ancestor of…“.
For these cases, we can define a NodePredicate (com.als.core.ast.NodePredicate) object:
| NodePredicate sample: |
We have already mentioned in a previous post the visitor strategy, with which we could go all along an AST nodes from a given one, using the accept methods provided by TreeNode.
| Visitor strategy: |
We can apply the same strategy, using the NodeVisitor objects (com.als.core.ast.NodeVisitor), to any subtree within the tree we are dealing with:
| Applying Visitor: |
High-Level AST and Low-Level AST
You may have noticed, working with our tool Kiuwan Rule Developer, that the nodes types of the generated AST vary depending on the language of the source code we are analyzing. Therefore, this is something you should always keep in mind when developing your rules: each rule will be specific for the analysis of a particular programming language.
The nodes that Kiuwan Rule Developer shows us by default are the low level nodes, Low-Level AST, which show in detail each one of the processed code elements. However, for certain rules, perhaps it is not necessary so much detail and it would be enough with a somewhat higher abstraction.
Therefore, with certain technologies (Java, C++, C#, Cobol, Javascript), we can access the high level nodes, High-Level AST, representing elements to a less detailed level. To see one level of abstraction or the other, in Kiuwan Rule Developer‘s ‘Syntax Tree‘ tab, we can find ‘Full Tree’ and ‘Summarized Tree’ options (only available in those technologies that support them).
With ASTSwitcher (com.optimyth.qaking.highlevelapi.ast.util.ASTSwitcher) utility, we can convert low-level nodes into high-level ones and vice versa.
| Low-Level AST <–> High-Level AST conversion |
As achieve perfection at the first attempt is often complicated, we remind you that you have the possibility to debug the implementation of your rules. Check Guillermo Simmross’ post about it for further information. To expand and consilidate the concepts we have written about, please consult the documentation in development\doc directory of Kiuwan Local Analyzer distribution.
We invite you to keep visiting us to continue exploring the capabilites provided for developing your KIUWAN rules.